 Enter Customers
The basic information on your customers is entered, modified, and deleted here on the Enter Customers screen. All customers must be entered here before any information can be entered about them in other modules (invoices, payments, dispatches, equipment, history, and agreements).
Each customer can have a master billing address and many location addresses where work is actually performed.
Each customer record is broken down into six sections: General, Locations, Additional Info, Sort Codes, Documents and Equipment.
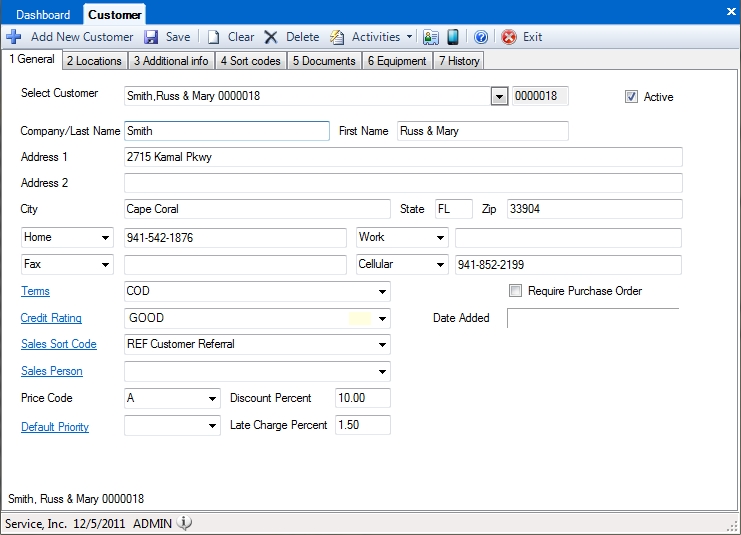
This tab is used to enter information about the customer's master billing address. This includes information that affects the customer as a whole such as terms and salesman. Here is a field by field breakdown of this tab:
Customer
This field is used to enter or display the customer number. The customer number is a unique seven-digit identification number that is assigned to each customer. This field can be used to perform the following actions:
Entering a New Customer
To enter a new customer click the Add New Customer button. The system will automatically assign the new customer the next available customer number. The customer number counter can be set or re-set in the Set Customer Counter screen.
Recalling an Existing Customer
To search for a particular customer start entering the customer's name in the Select Customer field. The field will automatically fill with the customer that is the closest match. Keep typing until the desired customer is displayed then press the Tab key to select them.
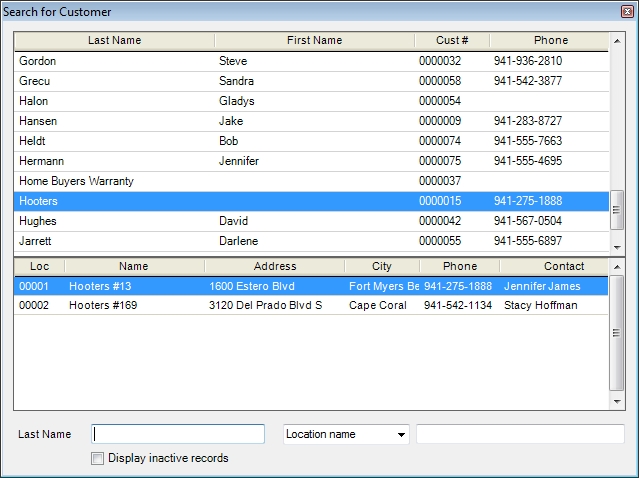
To search by anything other than name, click the pull down arrow on the right of the field to get the full customer search screen. Customers may be searched by Customer Name, Location Name, Location Address, Location Street, Phone Number, Email, Equipment Serial Number, Equipment ID or Contact Name. When a customer is located, all locations for that customer are displayed in the grid on the bottom part of the search window. The location for which the call is being generated may be selected by double-clicking on that line.
Speed Tip: The TAB key can also be used to switch sections. The up- and down-arrow keys will highlight items within the section and the ENTER key will display the customer’s information.
You can also bypass the customer name field and enter the customer's number, if known, directly in the field to the right of this one.
Active
This box is normally checked to indicate the customer is currently active. You can make a customer and all of its locations inactive by deselecting this box. See Making Customers Inactive for more details on the effects of doing this.
Company / Last Name
This field is used to enter or display the customer’s company name or last name. The information entered in this field is used when performing a search in the Customer field. It’s also used to sort customers in alphabetical order for reports.
First Name
This field is used to enter or display the customer’s first name. It should be left blank if the customer is a company. For example, if you have a customer whose name is "ABC Company", it should be entered into the Company/Last Name field so that the proper searching and selecting may be done. If "Company" is entered into the Last Name field, and "ABC" is entered into the First Name field, this customer will be alphabetically listed under "Company" rather than "ABC".
Address 1
This field is used to enter or display the customer’s street address or PO Box.
Address 2
This field is used to enter or display additional address information. This includes suite/apartment/condo numbers, rural routes, etc. If your customer has only one address line (e.g.: 123 Elm Street), enter it into the Address 1 field.
City
This field is used to enter or display the city where the customer is located. As a shortcut you can enter the zip code here instead. If this zip code has been imported or used before the City and State fields will automatically be filled in. If this is the zip code doesn't already exist in the system it will be copied to the Zip Code field and the cursor will return to this field so that the correct city can be entered. If there are multiple cities with the same zip code that have been used before in the system, a drop-down box will appear with the cities listed. Click on the desired city.
State
This field is used to enter or display the two-letter abbreviation of the state where the customer is located. If the zip code has been entered into the City field, and if it has been used before, the state will automatically be displayed.
Zip Code
This field is used to enter or display the zip code for the customer’s address. A complete list of zip codes for your state can be imported into the ESC database by using the Import Zip Codes screen.
Phone Numbers

These fields are used to enter or display the customer’s phone numbers. Select the desired phone label from the list or manually change one on the fly. The default phone labels can be changed anytime using the Customer Defaults screen.
Brackets or dashes are not required when entering the phone number - the program will add them automatically. Also, the customer’s area code is not needed if it is the same as the area code entered on the Company Information screen - the program will add that automatically also.
Terms
This field is used to enter or display the payment terms assigned to the customer. These terms will automatically be applied to all invoices created for the customer although the terms can be changed on the invoice if desired.
Terms can be set up on the Setup Terms screen. The default term for new customers can be set on the Customer Defaults screen.
Credit Rating
This field is used to enter or display the customer’s credit rating. This is a free-form field that can be used to enter a credit rating from Dunn & Bradstreet, TRW, or one that is custom created. Examples: AAA, B+, 5, Good, etc.
The credit rating will appear on the Customer Qualification screen and in the Collection Manager giving the end-user the ability to evaluate the customer’s standing with the company.
Sales Sort Codes
Sales Sort Codes allow you to track the effectiveness of your advertising campaigns. Use this field to select how the customer heard about you. Codes can be created or edited on the Enter Sales Sort Codes screen.
Sales Person
Use this field to set a default sales person for this customer. This sales person will then automatically appear on all invoices for this customer by default.
Price Code
This field is used to enter or display the standard inventory price markup for this customer. The inventory pricing structure allows three standard markup codes; A, B, and C. Markup Code A is used for normal retail pricing. Some customers may receive special pricing consideration, which can be price code B or C. This field defaults to price code A. See the Enter Markup Codes screen for more details. This screen can be reached by pulling-down the Inventory menu, and then clicking Enter Markup Codes. This code will be used by default when an invoice is created for this customer. It can be changed on the invoice itself, if desired.
Default Priority
The Default Priority field sets the priority that will appear by default for all dispatches created for this customer. If left blank, the dispatch will show the default dispatch priority, which is 2 by default.
Discount Percent
The purpose of this field is to enter a default discount percentage that can be applied to an invoice on demand. This percentage can be added to an invoice by entering a discount billing code (such as "DISC") in the Product / Code field of the Sales Invoicing screen.
Late Charge Percent
This field is used to set the monthly percentage that will be multiplied by the customer’s delinquent balance to create a late charge amount. Examples: 1.25, 1.5, 2. Note: This field is not used with the QuickBooks or Peachtree accounting interfaces as statements and late fees will be generated in those programs.
The default percentage for new customers can be set on the Customer Defaults screen.
The Minimum Late Charge, Minimum Balance Required to Apply Late Charge, and the Number of Days Delinquent Before Applying Late Charge can all be set on the Receivables Defaults screen.
Late charges will only be applied when printing statements.
Require Purchase Order
If "Yes" is set here, a PO number will be required for an invoice or dispatch for this customer. The default for this field is No. Press Y to change this field to Yes. If an invoice or dispatch is entered for a customer who has a "Y" in this field, the "Require PO" field will be highlighted, and the invoice or dispatch cannot be saved until an entry is made in this field.
Date Added
This field will be filled out automatically by the system when a customer is first created. It cannot be edited manually.
Integration Link
When integrating with QuickBooks or Peachtree, the record this customer is linked to will appear in the bottom left-hand corner of the screen. This can help you readily identify this customer in your accounting software if you have several customers with similar names.
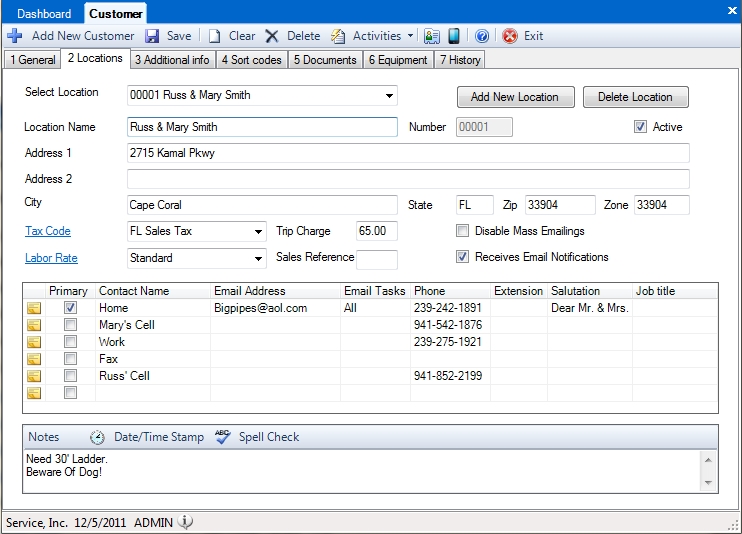
This tab is used to keep track of where work is actually performed for the customer. Every customer is automatically assigned a location code of 00001, which defaults to the same address entered on the General tab for that customer. Customers who have several different locations but identical billing information can will assign a different location name and number for each.
Example: A customer owns a chain of five restaurants. The corporate office is set up as location 00001 and is identical to the Master Billing Address. Each restaurant is then assigned a different location number: 00002 through 00006. Any location other than 00001 that is invoiced will use the Billing Address of location 00001 by default. On the other hand, if each of these five restaurants is responsible for their own service and billing, they can be set up as their own separate customer number with only a single 00001 location.
Each customer can have a Master Billing Address and many location addresses where work is actually performed. The fields located on this tab are used to keep track of each location separately while retaining the same billing information for each one. All the fields on this tab are location-specific. This means that the notes and labor rates entered for one location will not show up when switching to a different location.
Edit an Existing Location
Use the Select Location field to choose the location you wish to view or edit.
Create a New Location
To create a new location select the Add New Location button then fill out the fields below.
Location Name
This field is used to show the name of the currently selected location. This is the name that will appear on the Electronic Dispatch Board when dispatches are created for this location.
Active
This box is normally checked to indicate the currently selected location is active. You can make the location inactive by deselecting this box. See Making Customers Inactive for more details on the effects of doing this.
Location Address 1
This field is used to enter or display the location’s street address or PO Box.
Location Address 2
This field is used to enter or display additional address information. This includes suite/apartment/condo numbers, rural routes, etc. If the location has only one address line, use the Location Address 1 (e.g.: "123 Elm Street").
City
This field is used to enter or display the city where the location is located. As a shortcut you can enter the zip code here instead. If this zip code has been imported or used before the City and State fields will automatically be filled in. If this is the zip code doesn't already exist in the system it will be copied to the Zip Code field and the cursor will return to this field so that the correct city can be entered. If there are multiple cities with the same zip code that have been used before in the system, a drop-down box will appear with the cities listed. Click on the desired city.
State
This field is used to enter or display the two-letter abbreviation of the state where the location is located. If the zip code has been entered into the City field, and if it has been used before, the state will automatically be displayed.
Zip Code
This field is used to enter or display the zip code for the location’s address. A complete list of zip codes for your state can be imported into the ESC database by using the Import Zip Codes screen.
Zone
The Zone field is used to type a free-form entry that can be used to do "zone dispatching". This field is generally used to show the area that contains the location address. This information allows the dispatcher to assign dispatches to technicians that are already near the location address to minimize travel time.
When entering a new location for a customer this field will default to the zip code of the location address.
Tax Code
This field is used to enter or display the tax code for the customer’s currently selected location. Tax Codes are used to determine which items should be taxed, the tax amount, and the general ledger tax accounts to use when entering an invoice for the customer.
Tax codes can be created or edited on the Sales Tax Codes setup screen.
Labor Rate
This field is used to enter or display the labor rate to be used at this location for the primary technician and any helpers. This field will be automatically populated by the default labor rate set on the Customer Defaults screen.
By clicking the Labor Rate label to the left of this field, you will be able to see the values for all existing labor rates. You will also be able to create new ones on the fly.
See the Enter Billing Codes section of this manual for full details on how to apply this labor rate.
Trip Charge
This field is used to enter or display the amount of the trip charge or inspection charge applicable to the customer’s currently selected location. The default rate can be set in the Default Trip Charge or Inspection Charge field. This field is located on the Customer Defaults screen which can be reached by pulling-down the Company menu, clicking System Setup, and then clicking Customer Defaults.
This field can only be modified from the Enter Customers screen.
Sales Reference
This field is used to enter or display any special invoicing notes for this customer. This information will appear on the Sales Invoicing screen but it will not print out on the invoice. Examples: tax exempt, special discounts, etc.
Disable Mass Emailings
Select this option to exclude this location from receiving any emails sent through Report Generation.
The Contact Area
The contact area is where you can enter contact names, phone numbers with extensions, email addresses and tasks, salutations and job titles for people at the location address. Use the Contact Name field to list the name of the contact and the type of contact information you're entering, such as whether this is their contact information at home, work, on their cell, etc. Then use the remaining fields to enter more information about that contact.
If you are able to get the contact's email address, be sure to enter it here. This will allow you to send emails directly to them through ESC using the mail merge icon to the left of the contact name.
Use the email tasks field to determine what will be sent to the customer via email. Select Billing to send invoices and statements, General to send emails through Report Generation and All to be able to email all of these items. Leave this field blank if you would prefer to print things out for this contact. If multiple contacts are configured to receive the same thing they will all receive it when it is sent.
Example: If one contact is set to All and another is set to Billing, both contacts will receive invoices that are emailed but only the first one will receive marketing information you send out through Report Generation.
Select which contact will be your primary contact and place a checkmark in the Primary box next to their information. This will make that contact appear at the top of the list once the customer is saved. The email address associated with this customer will also be the logon name the customer will need to use to access the customer side of ESC Front Office.
Use the Salutation field to display a personalized greeting that can be inserted into a merge letter. Be consistent when entering these salutations. For example: if you use a salutation of Mr. Smith for one customer do not put Dear Mr. Jones, on another or you will have a hard time using this field on your merge letters.
Location Notes
This field is a free-form text field that can be used to enter any desired information about the currently selected location. This information can include additional contacts, phone numbers, driving directions, instructions, etc. This information will be displayed on the Qualification, Dispatch Entry and Electronic Dispatch Board. It can also be configured to print on dispatch tickets.
Click the Date/Time Stampbutton to put the date and time at the end of the current location notes. This can be a great way to keep track of when changes happened to the customer.
Click the Spell Check button to perform a spelling check on the contents of the location notes. Even if you do not click this button ESC will still underline misspelled words in red so that you can correct them on the fly.
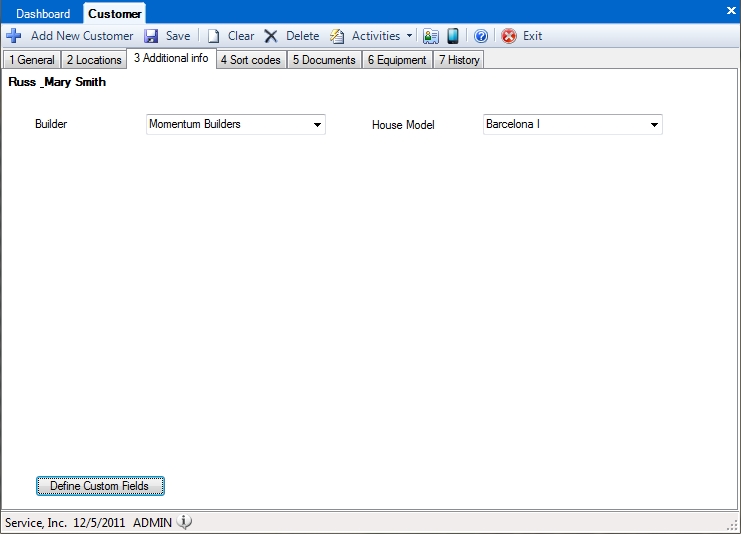
Custom data can be entered on the Additional Info tab. The custom fields can be created or modified using the Define Custom Fields button on this screen. Once custom fields have been created you can select values for each custom field from the pull down menu or manually enter any information you wish.
This data is location specific, so a customer with two different locations could have completely different values for each custom field. It is important to note that while the data for each location can be different the the labels would be the same for both.
For example: The database shown in the screen shot above has a custom field called Builder and House Model. Both locations could show a different Builder and House Model, but those fields would appear on both locations even if they were left blank.
This tab provides the ability to assign codes that can be used for sorting customers into groups for marketing purposes.
Example: A sort code may be set up for your residential customers, and another for your commercial customers. Another code might be set up for pet owners. In this way, a list of your residential customers may be generated, and/or a list of those customers who have pets may be created.
It’s important to keep in mind that sort codes are primarily used for marketing and to generate customer reports.
Sort codes are location specific, so a customer with two different locations could have completely different sort codes on each.
Sort Codes can be created or edited on the Enter Sort Codes screen.
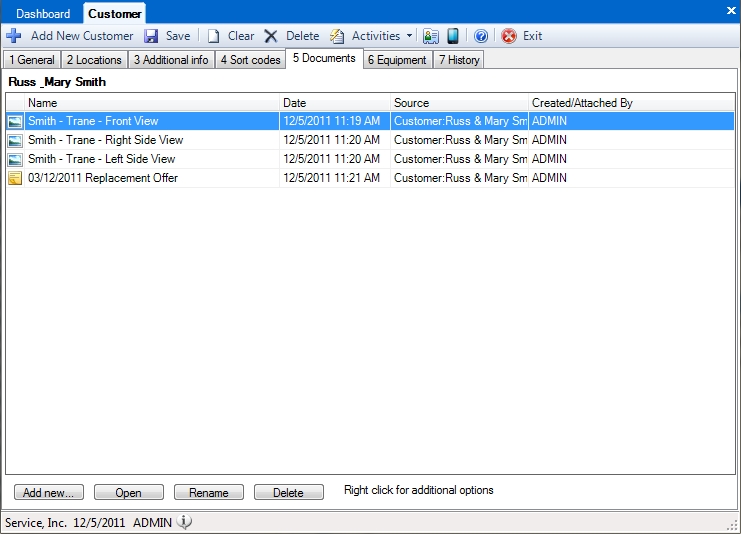
This tab allows you to attach file to the customers record that are then saved in the database where they can be accessed by anyone in the company (with the appropriate permissions) at any time.
Example: A detailed blueprint of the customers layout can be attached to the record. This information can then be viewed or even modified the next time the customer wants to add additional equipment.
See the Attaching Files and Word Processor help topics for more information on the proper use of this tab.
This tab shows you all the equipment the customer has at that location. Each piece of equipment can contain information including the manufacturer, model number, serial number, installation and warranty expiration dates, service agreement number, equipment location, and notes.
Adding New Equipment
To add a new piece of equipment to a customer’s file, search, locate and display the desired customer, and click on the Add New button on the upper left hand side of the screen. The entry screen below will be displayed:

Enter a new piece of equipment for this customer using the following fields:
Manufacturer
Enter the manufacturer here for the particular piece of equipment. It is important to standardize manufacturers’ names so that accurate sorting and selections can be made from other areas of the software. Frequently-used manufacturer names can be entered permanently into the system through the Enter Manufacturers List on the Customer Info pull-down menu. They will then be available to be selected in this field by clicking on the down-arrow and selecting the manufacturer type from the list. Any manufacturer that is entered into this field will not automatically be added to the manufacturers in the drop-down list.
Model
Enter the model number of this piece of equipment here. Standardization here is also important because of sorting and selecting features in other parts of the program.
Type
Use this field to select the general type of equipment you are entering. Equipment Types should be entered permanently into the system through the Enter Equipment Types on the Customer Info pull-down menu. They will then be available to be selected in this field by clicking on the down-arrow and selecting the equipment type from the list.
It is important to enter this information. It is common to forget what type of equipment is represented by a particular model number. Adding the equipment type removes that problem and also allows you to run reports based on customers that have a particular type of unit, regardless of who makes it or the model number.
Example: You may want to see all customers that have Gas Water Heaters regardless of who made them. Placing Gas Water Heater in this field will allow you to run an Equipment Report filtered by this field.
Equipment ID
Also known as an asset tag, this field allows youto assign your own unique number to the item that you will use to identify it. This number must be completely unique and once it has been assigned it cannot ever be changed.
Customers using this field will typically have pre-numbered labels created that include their contact information on them. The labels are then placed on the unit where they will be visible to the end user. You can then use this number to identify the customer when they call in by searching for it on the Qualification Screen.
This field may be ignored if you do not wish to record unique identifying numbers for your equipment records.
Serial Number
Enter the serial number for this piece of equipment. Equipment reports can be selected and generated by the Serial Number field. Customers may also be identified by searching for the serial number on the Qualification Screen and any of the equipment reports.
Mfg Code
Use this field to enter an additional manufacturer’s code if one exists. Equipment reports can be filtered by this field.
Set as master record on the service agreement for meter readings
This checkbox only appears if you have selected the Enter usage as meter readings checkbox on the Agreements tab of the System Setup screen. Check this box to specify that this piece of equipment is the one that the meter readings will be applied to. Many pieces of equipment may be attached to a service agreement that tracks meter readings but only can be the master. See the Enter Meter Readings topic for additional details.
Install Date
Enter the installation date of the piece of equipment in this field. All that is necessary is 6 straight digits without slashes, and the program will format the entry into correct date format. Examples: for dates in years less than 2000, enter "010199" (without quote marks), and it will format itself to be "01/01/1999". For dates in the year 2000 or following, enter "010103" (without quotes), and it will format itself to be "01/01/2003". Reports can be generated based on the Install Date.
Warranty
Enter the Warranty Expiration date of the piece of equipment in this field. All that is necessary is 6 straight digits without slashes, and the program will format the entry into correct date format. Examples: for dates in years less than 2000, enter "010199" (without quote marks), and it will format itself to be "01/01/1999". For dates in the year 2000 or following, enter "010103" (without quotes), and it will format itself to be "01/01/2003". Reports can be generated based on the Warranty date.
Agreement
Click on the down-arrow button to the right of this field to see the existing Service Agreements for this customer and location. Click on any agreement number to select it. Selecting a service agreement number is not required but it may be helpful to see which pieces of equipment are covered by the agreement. Equipment reports can be selected and generated by the Agreement field. Service agreements for your customers are entered through the Agreements | Enter Service Agreements screen.
Equipment Location
This field can be used to denote the physical location of this piece of equipment, such as "roof," "basement," "Bldg. 5," etc. Equipment reports can be selected and generated by the Equipment Location field. This information will also appear on dispatch tickets if they are set to print Equipment. This can be set from the System Setup - Dispatch screen.
Sort
Use this field to enter additional information about the selected piece of equipment. The information in this field can be selected when printing equipment reports. Up to 3 characters or numbers may be entered in this field. Example: A certain piece of equipment may have changed substantially over time but the model number remained the same. Use this field to keep track of the revisions. The same information could be entered in the Notes field, but the Notes field cannot be searched.
Notes
Many lines of free-form notes about the selected piece of equipment can be entered here. This information is visible in the Equipment Grid on the Equipment Entry and Qualification screen.
Custom Fields
These fields can be configured to store custom data about your customers' equipment. See the Equipment Custom Fields help topic for more details on how to setup and use these fields.
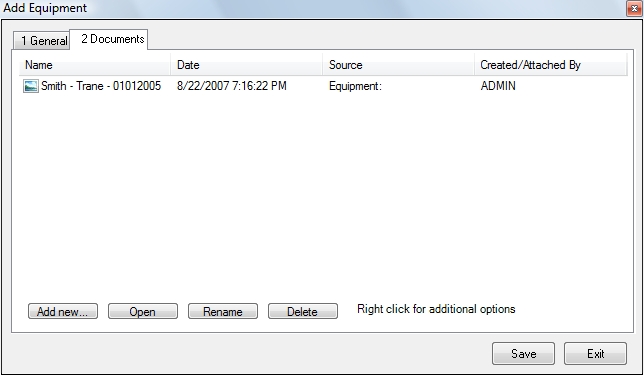
Attaching Documents to a Piece of Equipment
Documents can be attached to a piece of equipment by selecting the Documents tab then clicking the Add New button or right-clicking within the tab and select Add File from the resulting list. This can be great way to keep track of exactly what the equipment looked like on each visit (as shown below) or a convenient place to attach troubleshooting documents and schematics on the equipment. See Attaching Files for more details on attaching documents.
Editing Equipment Records
To edit any existing equipment record, either single-click on it and click on the Edit button, or double-click on the line. The Modify Equipment screen will be displayed showing that piece of equipment:
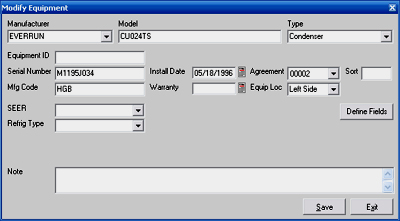
Make any changes in any fields and click on OK when done, then Save the customer.. Click on Cancel to exit the screen without saving any changes.
Deleting Equipment Records
If you wish to completely remove an equipment record from a customer’s equipment listing, search and display the customer, click on the equipment line, and click on the Delete button on the toolbar in the tab. A prompt will be displayed asking "Are you sure you want to delete the highlighted equipment?" Click Yes to delete the equipment record, or click No to cancel the procedure. Be sure to save the customer when you're done or the change will not be committed to the database.
Customizable Grid
The data in the equipment grid, which is displayed on the Equipment Information and Qualification screen, may be displayed in different ways depending on your preferences. Changes made to the grid will only affect the current company on the current computer.
Sorting the data: clicking on any column heading (Make, Model, Serial, etc.) will sort all of the equipment records in descending order. Note the down-arrow next to the column name that was clicked. Click it again, and an up-arrow will be displayed showing that the data has been sorted by that column in ascending order.
Column Resizing: With the mouse, pass the cursor over the dividing line between the column headings. It will change to a different icon when it sits exactly over the dividing line. Click and hold your mouse, and the divider may be moved to the left or to the right. In this way, any column in the grid may be resized depending on the amount of data that you wish to see.
Column Moving: Click and hold your mouse on any column heading, and move it to the left or to the right past other columns. Release the mouse, and it will drop the original column to the new position.
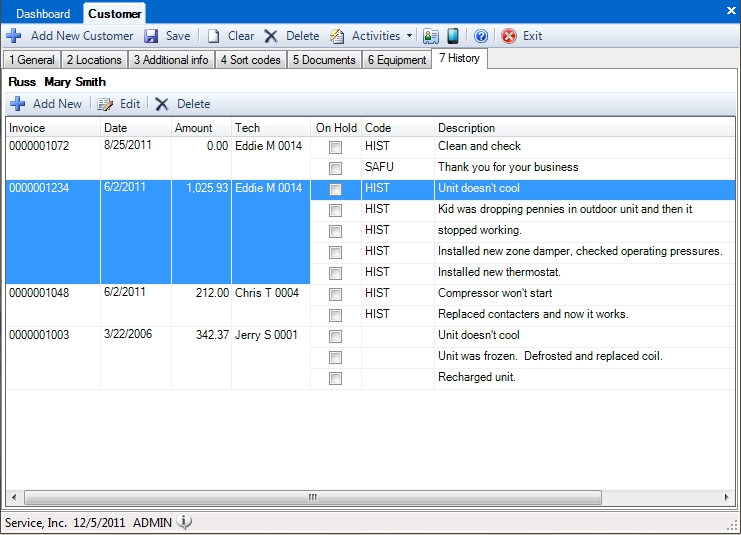
This tab shows you a complete history of all the work you have done for this particular location. This information is normally created when invoicing but you can use this screen to add or edit existing entries.
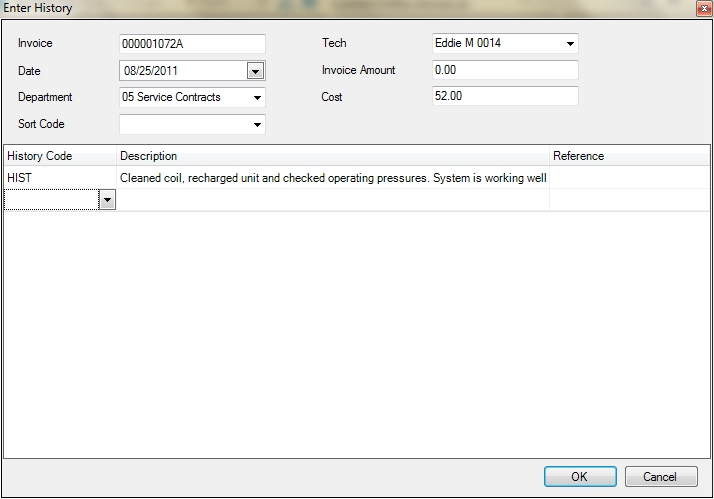
Adding A New History Record
Click on the Add New button to display the following screen. You'll be required to assign the record an invoice number and select the date the work was done. We highly recommend entering the employee, invoice amount and cost as well so that you can see who did the work, how much you charged and what it cost you to do it. In the body of the record select a history code from the list and edit the description to show what was done, then click OK to save it.
Editing an Existing History Record
Highlight the record you want to edit by clicking on it, then click the Edit button. This will either recall the invoice or the Enter History screen, depending on where the record was originally created. Once the record is displayed change it as desired and click Save or OK to make it take effect.
If the record was originally created from an invoice, and you can't modify the invoice because it has already been posted to QuickBooks or has a payment made against it, just create a new record instead using a similar invoice number (put the letter A or something after it) and use the same date as the original invoice. This will group the records together, so even though they will be separate, you will be able to see that they pertain to the same visit.


 6 Equipment
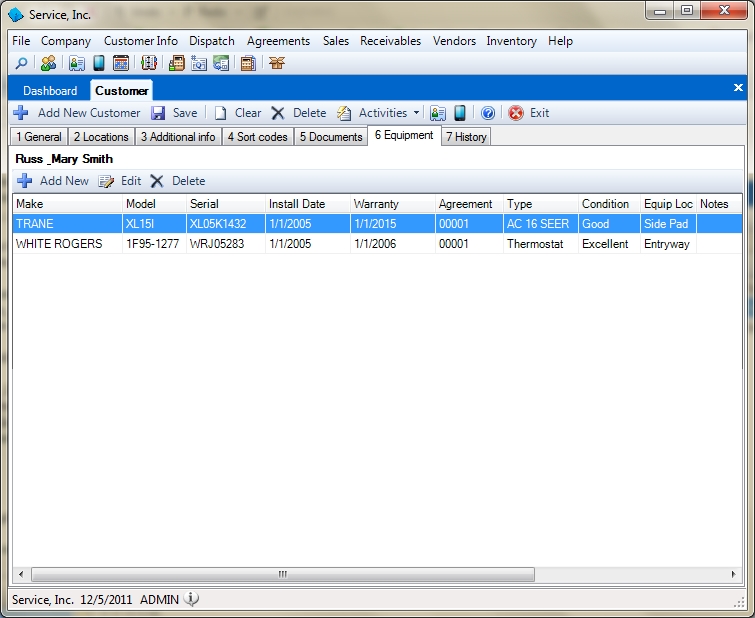
 How do I get to this screen?