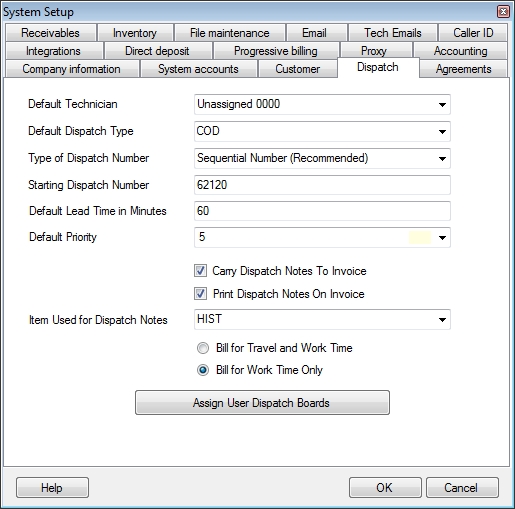
This screen allows you to set the defaults that will be applied to new dispatches as they are created. Changing these values will not affect existing dispatches.
Default Technician
When entering a dispatch on the Enter Dispatches screen, a technician number will appear automatically. Usually it is the "0000 Unassigned Technician", but it may be set to any technician number. Even though a default is set on this screen, the actual technician number may be changed on each dispatch. Enter a 4-digit technician number here. To view a list of employees that have been entered into the system, click on the magnifying glass, then double-click on the desired technician. To enter or edit technicians, pull-down the Dispatch menu and click on Enter Technicians.
Default Dispatch Type
Dispatch Types are generally used to let your technicians know if they need to collect for the work they perform in the field or if the customer will be billed later. When entering a dispatch on the Enter Dispatches screen, a type may be entered. The default that is set here will display automatically on new dispatches as they are created. Change the default here by clicking on the down-arrow, then selecting the desired type. Although this appears as a default when entering a dispatch, it can be overridden if desired on each invoice.
Type of Dispatch Number
When entering a dispatch, pressing Tab through the Dispatch Number field will set a default dispatch number. The default can either be a combination of the customer number and the date, or it can be a sequential number. If the sequential number is selected, the starting number is set in the Starting Dispatch Number field. We recommend leaving this set at Sequential.
Starting Dispatch Number
If the sequential number option is selected in the Type of Dispatch Number field, the starting number is set here.
Default Lead Time in Minutes
This number determines how many minutes to add to the Time Received field to calculate the Time Promised when a new dispatch is entered on the Enter Dispatches screen. When a dispatch passes the lead time, the call will display a red clock on the Electronic Dispatch Board to show that the call is late.
Default Priority
This value will be entered when pressing ENTER or TAB through a blank Priority field of the Enter Dispatches screen. If the priority is already filled out by the customer's default priority this value will be ignored. The dispatches that are printed on the Dispatch Schedule report can be selected by Priority. Also, if two calls on the Electronic Dispatch Board have the same technician, date and time promised, they are ranked by Priority.
Send Dispatch Notes to Invoice Options
When an invoice is created from a dispatch ESC can automatically transfer the dispatch notes and service request code descriptions into the invoice body. This can bring over valuable information without the need to re-enter anything. To allow this to occur you must select Carry Dispatch Notes to Invoice. Once that option has been set you can choose to automatically print this information in the body of the invoice by selecting Print Dispatch Notes on Invoice. Please note that this is just a default setting. The notes can still be printed or hidden on the invoice itself if needed, regardless of the setting you select here.
The last option that must be set is what history or billing code will be used for the items that are carried over. We recommend using the HIST history code if you want the notes to go to the customers history record when they are saved. We recommend using the DESC billing code if you don't need them there.
Billing Options
Select Bill for Travel and Work Time to combine the travel time and working time when creating an invoice based on a dispatch. This time will appear on the Technicians tab on the Sales Invoicing screen, so selecting this option will include the travel time in the labor cost of the invoice. The combined time will also appear immediately above the invoice body so that you will know what quantity to use when adding a labor billing code. Select Bill for Work Time Only to only show the times spent in a working status instead.
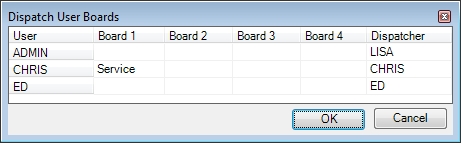
Assign User Dispatch Boards
Click this button to go to a setup screen where the dispatch boards a user can see can be limited. Leave Board 1 - 4 blank to allow the user access to all dispatch boards. If you put anything in the Board 1 - 4 fields, the user will only have access to those boards. This can be very handy for Front Office users who need some access to the dispatch board but may not need to see all calls. Enter the user's name in the Dispatch field to track the dispatches they assign.
See also:
System Setup - Company Information
System Setup - File Maintenance
System Setup - Progressive Billing
 How do I get to this screen?