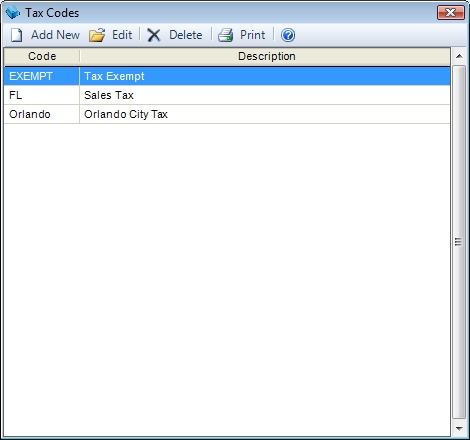
This screen is used to enter Tax Codes. Tax Codes determine the tax percentage you are required to collect, to whom it is payable, and what goods and services are taxed. In order to collect tax from your customers, these codes must be set up. Once created, Tax Codes can be assigned to each customer and location on the Enter Customers screen. Invoices created for a customer will then use the associated Tax Code by default.
Creating a New Tax Code
Click the Add New button to display the following screen which will allow you to create a new tax code.
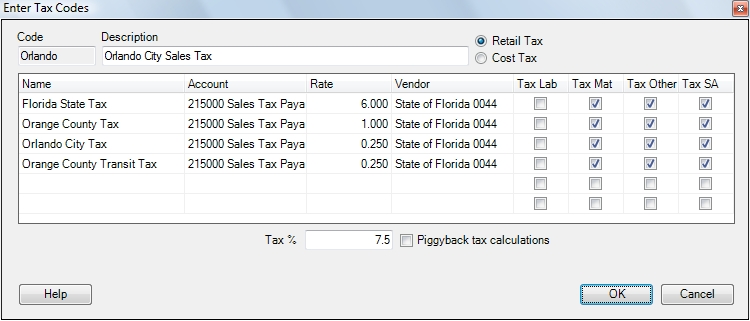
Create a name for your new tax code and give it a clear description that will help you assign it to customer locations in the future.
If the tax will be paid by the customer based on the price of the invoice, make it a Retail Tax. This is the most common kind of sales tax. If the tax will be paid by your company based on your costs of the items on the invoice instead, select Cost Tax. A cost tax does not increase the price of the invoice to the customer, only the cost of it to your company. If Cost Tax is selected you will also be required to select the account that will be debited when this tax code is used. This account is typically a Cost of Goods Sold type account.
Now enter all the components that make up the sales tax as separate line items. Assign each line item a name, an account (generally a Sales Tax Payable account), rate and vendor. On each line you must also declare what will be taxed. Select between any combination of Labor, Material, Other and Service Agreements.
Tax Lab - This option encompasses billing codes with a type of Labor or Helper.
Tax Mat - This option includes all inventory parts and billing codes with a type of Material, Equipment, Mat Markup or Equip Markup.
Tax Other - This option includes all billing codes with a type of Contract, Discount, Other and Other Markup.
Tax SA - This option includes billing codes with a type of Agreement.
Example: The screen shot shows a tax code that has been setup for Orlando, Florida. Orlando has a 7.5% sales tax that is broken down into 4 components. The first component is the Florida State sales tax. All counties in Florida are subject to this 6% tax. Orlando lies in Orange County which has assessed their own 1% sales tax on all cities it encompasses. The good city of Orlando has seen fit to add to the burden by adding a special .25% tax for all sales transaction that occur within city limits. A recent addition to the mix is the new .25% transit tax the county added to just Orlando residents.
If we were to create another tax code for a different city in Orange County we would need to ensure it contained the same first two line items. Tax line items that have the same name will be combined on the Sales Tax Liability Report so it is possible to see how much tax is due to the State of Florida regardless of the tax code used. Since this is generally what the state is looking for it is important to keep the names identical.
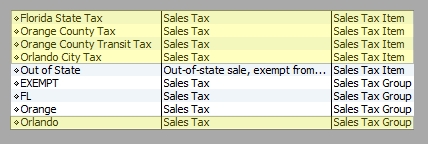
QuickBooks Note: This is also how tax codes are created when they are sent to QuickBooks. When an ESC Tax Code is added to QuickBooks through the QuickBooks Connection Wizard, QuickBooks creates a Sales Tax Item for each line item and a Sales Tax Group that contains all of the Sales Tax Items (as shown by the highlighted items below).
Peachtree Note: ESC cannot automatically create tax information in Peachtree but the concept is similar. Peachtree sales tax is divided into Tax Authorities and Tax Groups. Peachtree Tax Authorities should have the same names, rates and vendors as ESC Sales Tax Items. Peachtree Tax Groups should match the name of the ESC Sales Tax Code and be associated with Peachtree Tax Authorities that match the ESC Sales Tax Items.
QuickBooks Note: When integrating with QuickBooks you can only declare what will be taxed on the first Sales Tax Item. All other Sales Tax Items in the same code will be set identically to the first one. To use the previous example, if the State of Florida charges sales tax on Material, the City of Orlando cannot be set not to in the same Sales Tax Code.
Integration Note: If you are integrating with QuickBooks or Peachtree you will need to run the Connection Wizard to ensure the tax is added or matched to your accounting software.
Canadian Tax Considerations
Piggyback Tax Calculations
Select this option to apply the tax shown on lines 2 - 6 to the invoice total plus the tax assigned on higher lines. This can be very useful for Canadian customers who have a PST that is applied to the total of the invoice plus the amount of the GST.
Example: The first line in the tax code is GST for 5%. The second line of the tax code is PST at 8%. When this tax code is applied to a $100.00 invoice the tax will be $13.40. This is calculated as follows: $100.00 x 5% = $5.00. Now we add that tax to the invoice amount before calculating the next tax line: $100.00 + $5.00 = $105.00 x 8% = $8.40. So the invoice total is $105.00 + $8.40 = $113.40.
Separate Canadian GST/PST on Invoice
Checking this option for Canadian ESC users will allow the invoice to print with the GST and PST taxes listed separately. In order to use this the tax code must only contain two lines and the first line must be the GST.
Modifying an Existing Code
To modify an existing code, double click it. Changes made to the tax code will not affect invoices that have already been created unless they are recalled, modified and saved. Changes will take effect immediately, however, on any new invoices created from that point forward.
Integration Note: If you are integrating with QuickBooks or Peachtree you will need to run the Connection Wizard to ensure the tax is added or matched to your accounting software.
Deleting an Existing Code
Once a tax code has been used on an invoice it cannot be deleted. To delete a tax code that is not associated with any invoices select it and click the Delete button.
 Sample Canadian Tax Code
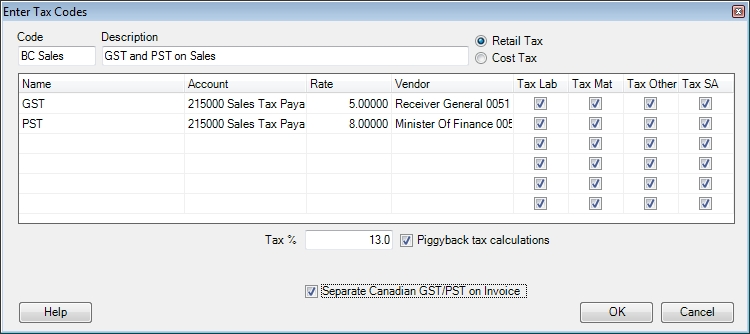
 Related Topics