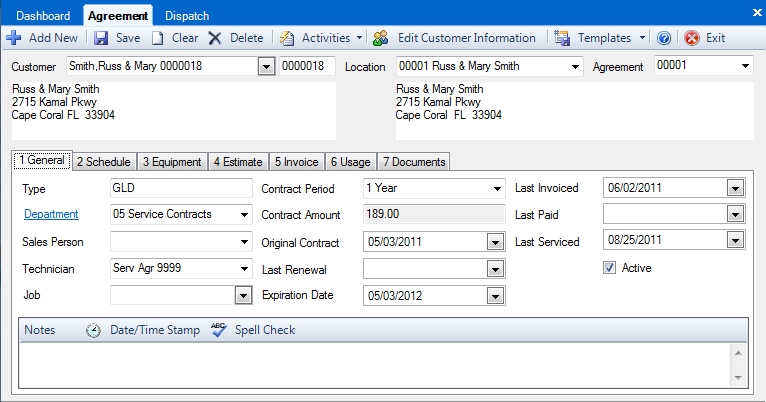
Your customer’s service agreements are entered and maintained here. Information about the service agreement type, duration, amount, scheduled maintenance, usage statistics, and preferred technician is available at one time on this screen. This information can be used to automatically create renewal sales invoices when agreements approach the expiration date, create dispatches for scheduled preventative maintenance, and even customize tasking codes per customer to show the material needed to complete the scheduled maintenance.
Customer Number
Recall the desired customer number by entering the customer number. If this number is not known, type in the beginning of the customer’s company or last name and press the TAB key or click on the magnifying glass icon. A search screen will be displayed. The first customer that matches what was typed will be highlighted. Click the desired customer or use the arrow keys to highlight the line. If the customer’s name does not appear in the list, use the up- and down-arrows to view additional customers. Click on the appropriate location in the bottom section to select it. Click OK to display that customer’s information.
Location
Use this field to enter the desired customer location. Press the TAB key while the field is blank to select location 00001. The desired location for this customer must have been previously entered in the Customer Entry screen.
Agreement
This field is used to recall and enter the agreement number. To set up a new agreement, enter the desired agreement number or press the TAB key to set it to 00001. To recall an agreement, enter the number and press the TAB key. If the number is not known, click on the down arrow button to the right of this field to see a complete list of service agreements for the selected customer location. Click on the appropriate one. The system is capable of tracking multiple service agreements per customer location.
Type
This field is used to identify the type of service agreement the customer has purchased. This is a 3-character free-form entry. This information can be searched and displayed on various reports. We recommend filling out this field even if only one type of service agreement is sold. This allows others to be added at a later date.
Department
This field is used to select the sales department that receives credit for the agreement. Click on the down arrow key to the right of this field to see a full list of available departments. Click on the desired department to select it. When a service agreement invoice is posted from the service agreement module to the sales file, the department number is included. This ensures that the proper sales department receives credit for the renewal of this invoice. The sales department number here also directs this invoice to be printed on the appropriate Departmental Sales Reports. To create a new sales department, see Enter Sales Departments.
Salesperson
This field is used to select the salesperson that sold the service agreement. Click on the down-arrow key to the right of this field to see a full list of employees. Select the desired employee by clicking on the appropriate line. If an employee doesn’t appear in this drop-down list, enter them through the Dispatch | Enter Technicians screen.
Preferred Technician
This field is used to select the technician that will be assigned to the dispatch when it is automatically created through the Post Schedule to Dispatch screen. Click on the down arrow key to the right of this field to see a full list of employees. Select the desired employee by clicking on the appropriate line. If an employee doesn’t appear in this drop-down list, enter them through the Dispatch | Enter Technicians screen.
We generally recommend setting this field to a special non-technician that is created especially for this purpose. This directs the service agreement dispatches to a separate column on the Electronic Dispatch Board so they can be viewed without normal everyday service calls being included in the column. They can then be assigned to actual technicians as the schedule permits. If an employee doesn’t appear in this drop-down list, enter them through the Dispatch | Enter Technicians screen. The default technician is set on the Company, System Setup, Service Agreements screen. For example, the default technician may be set to "9999", and when a new service agreement is entered, "9999" will appear as the Preferred Technician. When this service agreement is posted to the dispatch file, and if the "9999" technician is set up in Setup Dispatch Boards, this service agreement dispatch will appear in this column. In individual cases, if your customer requests a particular technician to do their work, or if you want to designate a certain tech with certain skills for this agreement, the "9999" may be replaced by the appropriate technician’s number. When the schedule is posted to dispatch, this call will then appear under that respective technician’s column rather than appear in the "9999" column.
Job Number
Use this field to enter a job number for the service agreement. Job Numbers are entered into the system under Customer Info, Setup Jobs.
Contract Period
This field is used to choose the length, in years, of the service contract. Type a number from 1 to 5, and then press the TAB key to go to the next field. This field will determine the default expiration date of an agreement, as well as dictate how often a service agreement invoice is created using the Invoice tab. A 1-year contract will generate invoices each year, for example, while a five-year contract will automatically bill every 5 years. The Date Last Invoiced field will determine when the next invoice will be created.
Contract Amount
Use this field to enter the amount of the service contract. If an invoice code is used in the Invoice Code field for the automatic invoicing for this agreement, the total amount on the Invoice Code will appear here in the Contract Amount field. This field will be "grayed-out" to prevent editing.
Original Contract Date
Enter the date that the customer first purchased this service agreement. Dates should be entered in a six-digit format. Example: 010202 for January 2, 2002.
Last Renew Date
This field is used to show the last date the agreement was renewed. This date is generally entered manually.
This field can be updated automatically when a customer pays off the invoice created by the billing code attached to this service agreement using the Enter Payments screen. To setup this functionality, check the Auto-update renewal date/expiration date when paying invoices box on the Company | System Setup | Service Agreements screen.
Expiration Date
This field shows the expiration date of the service agreement. This will be calculated automatically when initially entering an agreement by the Contract Periods being added to the Last Renew Date. This date is generally entered manually.
This field can be updated automatically when a customer pays off the invoice created by the billing code attached to this service agreement using the Enter Payments screen. To setup this functionality, check the Auto-update renewal date/expiration date when paying invoices box on the Company | System Setup | Service Agreements screen.
Date Last Invoiced
This field is used to show the last time the customer was invoiced for this service agreement. This will be automatically updated when an invoice is generated for the customer through the Post Monthly Invoices function. It can also be edited manually by entering the date in a six-digit format, as might be the case when the software is initially installed. Example: 010202 for January 2, 2002. This field also will be updated by generating a sales invoice for this customer that has this service agreement number selected in the Service Agreement field of the Sales Invoicing screen. In addition, this field will determine when the next agreement for the invoice will be generated, using the Contract Period.
Date Last Paid
This field is used to show the last time the customer paid the invoice generated by the Post Monthly Invoices screen. This field will be updated automatically as the invoices are paid through the Enter Payments screen in Accounts Receivable. It can also be edited manually by entering the date in a six-digit format. Example: 010202 for January 2, 2002. The Date Last Paid will appear for this customer on the Dispatch Qualification Screen.
Date Last Serviced
This field is used to show the last time a service agreement dispatch, generated by the Post Schedule To Dispatch screen, was completed. It can also be edited manually by entering the date in a six-digit format. Example: 010202 for January 2, 2002. This field also is updated by a normal service dispatch that is entered in the Enter Dispatches screen that has this service agreement number for this customer and location selected in the SA Number field.
Attach Equipment
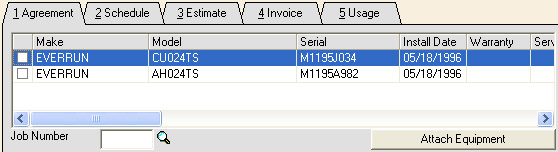
The Attach Equipment screen will be displayed (above) which shows all of the equipment that has been entered for that customer and location. One or more than one piece of equipment may be attached to this service agreement by checking the checkbox on the left side of the line item. Any column may be sorted in ascending order by clicking on the title of the column, after which an up-arrow will be seen to the right of the column title. Clicking the same column again will show a down-arrow, and the equipment will be sorted by that column in descending order. If any column is clicked for sorting, typing in a character will "jump" to that alphabetic point in the list. This makes it easy to locate a particular piece of customer’s equipment in a list that might contain dozens of items or more.
Attaching Equipment will associate the service agreement number with each selected item. To show the selected equipment on dispatches created by the service agreement module, be sure to select Print Equipment on Dispatch Ticket from the Company | System Setup | Dispatch screen.
Notes
This field is used to enter and display any free-form notes about the selected service agreement.
Active Checkbox
Removing the checkmark from the active box will mark a customer’s service agreement as inactive. This will prevent it from creating a dispatch when Posting Schedule to Dispatch, and it will also prevent an invoice from being created when Posting Monthly Invoices. The agreement itself doesn’t need to be deleted from the system in order to stop servicing the customer.
Example: Through the Post Monthly Invoices program, sales invoices are generated for agreement renewal and mailed to the customers. There will be some of those who may contact you to cancel their agreement because of various reasons (like moving, choosing another service company, etc.), and there will likewise be some who never respond back at all. In these cases, you may wish to keep their agreements in the system for future reference. Instead of deleting the agreement, mark it Inactive. This agreement will not be included in the automatic generation of dispatches and invoices, but they still may be printed on service agreement reports. All agreement reports may be filtered by their Inactive status. At a future date, you may wish to print reports of those agreements that are no longer active for the purpose of contacting those customers and renewing their agreements.
See also:
Setting Up The Maintenance Schedule
Using the Service Agreement Estimates Screen
Invoicing through Service Agreements
 How do I get to this screen?