Word Processor
Overview
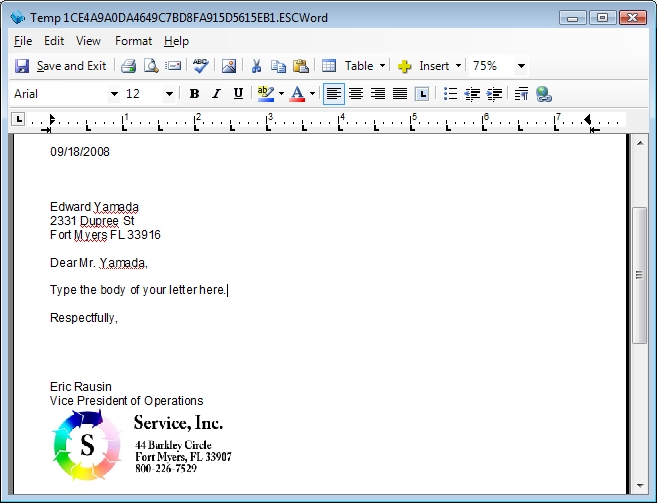
This screen enables you to format and compose letters directly from within ESC. It is extremely easy to use yet it supports most advanced formatting options such as bulleted and numbered lists, frames, tables, indent, font formatting and spell checking.
Pull Down Menus & Standard Toolbar Icons
File
This pull down menu allows you to save, print, email and close the existing screen.
Save and Exit
This option will display a save dialog box that will allow you to name the document. Click Save once you return to the Customer Entry screen to permanently attach the letter to the customer's record.
Page Setup
This option allows you set the margins the document will use
Print Preview
![]() Select
this option to see what the document will look like when it prints on
your default printer.
Select
this option to see what the document will look like when it prints on
your default printer.
![]() Select
this option to display the printer dialog box. Select
the desired settings and click OK
to print.
Select
this option to display the printer dialog box. Select
the desired settings and click OK
to print.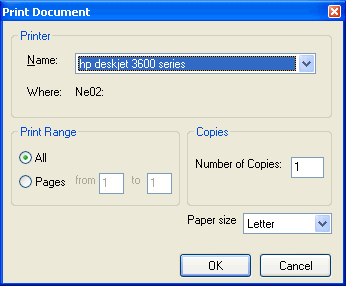
Close
Select this option to close the current window. You will be prompted to save the document when you select this option.
Edit
This pull down menu allows you to cut, copy and paste information on the existing screen.
Cut
![]() Highlight
information in the document and then select this option to remove it from
its current position and save it to the Windows Clipboard. The
data can then be added back into the document in a more appropriate spot
using the Paste command.
Highlight
information in the document and then select this option to remove it from
its current position and save it to the Windows Clipboard. The
data can then be added back into the document in a more appropriate spot
using the Paste command.
Copy
![]() Select
information in the document and then click this button to place a copy
of that data onto the Windows Clipboard. The
information can then be duplicated by using the Paste
command.
Select
information in the document and then click this button to place a copy
of that data onto the Windows Clipboard. The
information can then be duplicated by using the Paste
command.
Paste
![]() Select
this option to add the contents of the Windows Clipboard to the document
where the cursor is located.
Select
this option to add the contents of the Windows Clipboard to the document
where the cursor is located.
View
This pull down menu allow you to change the zoom level and see/hide hidden formatting characters.
Zoom
Select between several different zoom levels. This has no affect on how the document prints.
Display Control Codes
Select this option to show or hide hidden formatting characters such as carriage returns and tabs.
Format
This pull down menu enables you to change the formatting of paragraphs and tables.
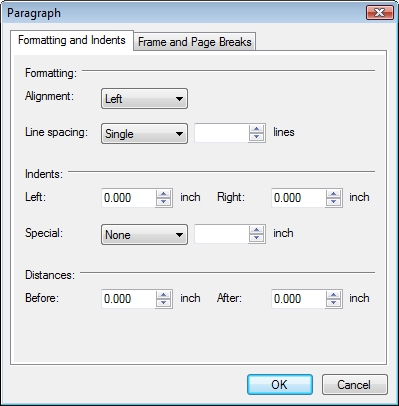
Paragraph
Before clicking this option, click into the paragraph you want to format. Once this option is selected, choose your formatting options from the resulting screen.
Paragraph Border
Select this option to place a border around the currently selected paragraph.
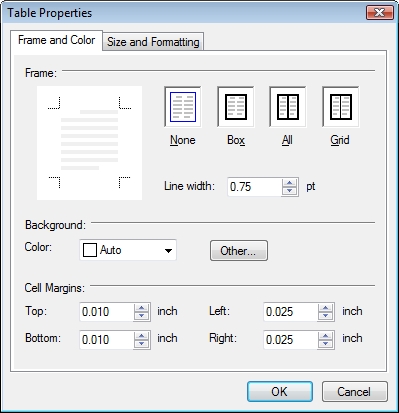
Table Properties
This option will be unavailable unless you first click into a table that you have inserted in the document. Once selected, it displays the following screen where you can select the cell borders, background, alignment and cell padding.
Send to Mail Recipient
![]() Select
this option to send the document to the customer via email. See
the Send Email help topic for more details
on this option.
Select
this option to send the document to the customer via email. See
the Send Email help topic for more details
on this option.
Spell Check
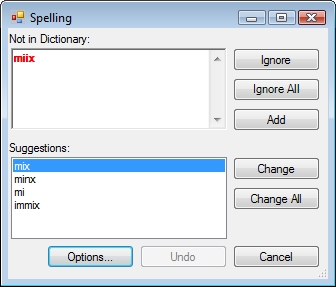
![]() Select
this option to spell check the entire document. If
misspelled words are found the following screen will be displayed. Click
on one of the Suggestions or enter
the desired word directly into the Change
To field, then click the Change
button to replace the misspelled word. Select
the Change All button to instead
to replace all occurrences of the misspelled word in the document.
Select
this option to spell check the entire document. If
misspelled words are found the following screen will be displayed. Click
on one of the Suggestions or enter
the desired word directly into the Change
To field, then click the Change
button to replace the misspelled word. Select
the Change All button to instead
to replace all occurrences of the misspelled word in the document.
If the word is not really misspelled you can click the Add button to add it to your personal dictionary. This is computer specific so adding a word to this computer will NOT add it to the other computers in your company. If you don't want to add it to your dictionary but don't want to change it either, select either the Ignore or Ignore All buttons to skip it.
Image
![]() Clicking
this allows you to add a picture to the document.
Clicking
this allows you to add a picture to the document.
Table
 This button displays a menu that allows you to insert and format tables in the document.
Insert
This button allows you to add merge items into the body of the document. This includes customer data as well as standard objects like today's date and page number. This data will appear as merge codes instead of actual data until the document is saved or printed.
Customer
This option allows you to merge data from the customer's main billing record directly into the letter. The Address block and Salutation are particularly helpful when writing letters.
Location
This option allows you to merge data from the customer's location record directly into the letter. This is helpful when you want to send a letter to the customer's location address instead of their billing address.
Header
Clicking this option will allow you to edit the document header. The header will be automatically applied to the top of every page in the document. This area is typically used to show the date the document was created and/or the page number, but you can use it any way you like. The First Page Header option in this menu does the same thing but only affects the first page of the document.
Footer
Click this option to edit the document footer. Just like the header, the footer will be automatically applied to the bottom of every page in the document. It is traditionally used to show page numbers. The First Page Footer option in this menu does the same thing but only affects the first page of the document.
Symbol
Place your cursor where you want to insert a symbol
then select this option. Pick
the symbol to be inserted from the resulting screen and click OK.
Page Break
This option will force a page break wherever the cursor is when selected.
Page Number
This option will insert the page number wherever the cursor is when selected. Typically this is inserted into the header or the footer record so it doesn't have to be added to each page manually.
of Page ___ (total pages)
Inserts the total number of pages in the document. Usually used in conjunction with the Page Number in the header or footer record as follows: Page [PGN] of [OFPAGE]
Short Date
This option will insert the current date using the format mM/dD/YYYY wherever the cursor is when selected. Example: 9/18/08
Long Date
This option will insert the current date using the format DayOfTheWeek, Month dD, YYYY wherever the cursor is when selected. Example: Thursday, September 18, 2008.
Time
This option will insert the current time wherever the cursor is when selected.
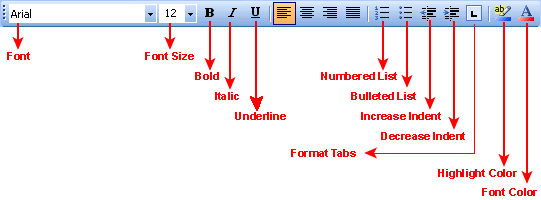
Formatting Toolbar Icons
Select a block of text and then use these formatting icons to make it look the way you want.
 How do I get to this screen?
 Related Topics