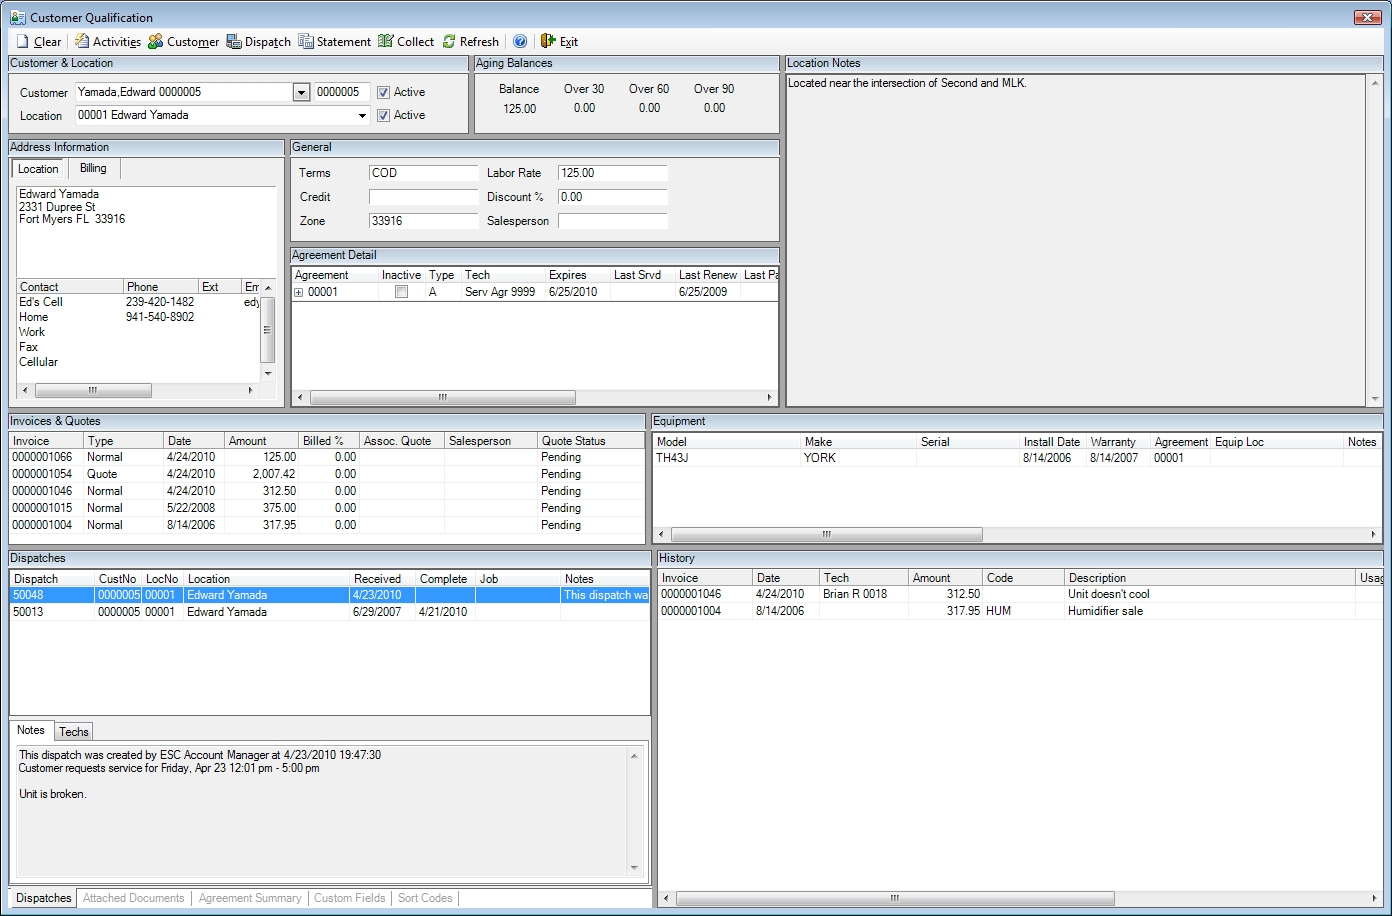
The Qualification Screen is a customizable screen designed to give you a complete overview of your customers. By recalling an existing customer on this screen you can quickly see all of the customer's critical information. This is the screen to start on whenever a customer calls you or you want to look up information about them.
Although it is not possible to make changes on this screen, you can drill down into almost any piece of data on it to edit it without performing any other searches.
The Qualification Screen is broken down into many separate panels which contain specific information. Here is a break down of each panel.
Customer & Location
This panel is used to search for the customer and location you want to see. Once the customer has been found this panel will also show the selected customer's name and number, the location name and number, as well as whether the customer and location are active or not.
Although it can be placed anywhere on the screen, we highly recommend keeping this panel in the upper left-hand corner to making searching consistent and easy across all computers in your office.
To locate a customer, start typing their name in the customer field and ESC will automatically fill in the first customer that matches the name you are entering. If this is an exact match, press the Tab key to accept the customer and information about their first location will be displayed. If you want to see a list of all customers and locations that match what you typed or if you want to further refine the search press Enter instead to bring up the Search for Customer screen.
The Search for Customer screen is divided into 3 major areas. The top of the screen shows the customers that match the search criteria you have entered. The middle section shows all the locations associated with the customer selected in the top part. The bottom section allows you to perform a primary search for customers by Last Name or Company Name. Secondary searches can also be performed by Location Name, Address, Street (the main address line without the unit or house number), Phone Numbers, Serial Numbers, Email Addresses, Contact Name and Asset tag. These searches can be combined with the Name search if desired by filling out both fields.
Once you locate the customer you want click the location to display them on the Qualification Screen.
Note: Most of the secondary searches show results in real time as you type. Searches by Serial Number or Equipment ID, however, will not show any results until the entire number has been entered. Phone Number searches will not be performed until the entire 10 digit phone number has been entered and the Tab key is pressed. Alternately a 7 digit phone number can be entered. When Tab is pressed, your company's area code will automatically be appended to the beginning of the number and the search will be performed. Phone number searches include all phone numbers associated with a customer AND their locations.
Note: It is also possible to recall a customer on the Qualification Screen directly by entering their customer number in the field to the right of the customer's name.
Address Information
This panel shows the customer's address as well as all associated phone numbers and email addresses. Tabs at the top of the panel allow you to quickly switch back and forth between viewing the customer's main billing information and information about the currently selected location. This information can be quickly modified by pressing ALT+M or selecting Activities | Edit Customer Information to recall the customer on the Customer Entry screen.
Aging Balances
This panel displays the customer’s total aged balance. Unlike the rest of this screen, this information is not specific to any location. The balances displayed are the total receivables due for all of the customer’s locations. Balances over 60 days will be highlighted in yellow and those over 90 will be highlighted in red to let you know that you may not want to perform more work for this customer until they pay the past due balance.
QuickBooks Note: QuickBooks keeps track of the customer's receivable balance. Because of this, invoices that have not been posted to QuickBooks will not appear in this balance.
Peachtree Note: Peachtree keeps track of the customer's receivable balance. Because of this, invoices that have not been posted to Peachtree will not appear in this balance.
General
This frame shows you general information about the customer such as terms, credit rating, labor rate, discount percentage, zone and salesperson. This information can be quickly modified by pressing ALT+M or selecting Activities | Edit Customer Information to recall the customer on the Customer Entry screen.
Location Notes
This panel automatically displays the customer's location notes. This information can be quickly modified by pressing ALT+M or selecting Activities | Edit Customer Information to recall the customer on the Customer Entry screen.
Equipment
This panel displays all the equipment installed at the customer’s location. Double-click any line to recall the equipment record for editing or viewing. New equipment items can be added by clicking Activities | Enter Equipment.
The equipment is sorted in the order of entry, with the oldest information displayed first. You can change the sort order, however, by clicking any of the headings. Clicking the same heading twice will reverse the sort.
This frame even allows you to customize the order of the fields within the frame itself. To do this, click on one of the headings and hold the mouse button down. Drag the heading to the left or right to rearrange it. Release the mouse button to place the column. The columns can also be resized by dragging the dividing line between the column headers. These changes will be saved on your computer when you exit the qualification screen.
You see a complete list of all dispatches and invoices associated with a piece of equipment by right clicking it and selecting Show Dispatches or Show Invoices. This can be very handy to see how often a particular piece of equipment has needed work and the expense involved.
History
This panel displays information about the services that have been performed at the customer’s location. This information is sorted in reverse date order, with the most recent information displayed first.
To recall a history record, right click the record and select Recall History Record or Recall Invoice depending on where the record was created.
Dispatches
This panel displays a complete list of all dispatches ever created for this location, sorted in descending order by dispatch number. You can change the sort order by clicking any of the headings. Clicking the same heading twice will reverse the sort.
To recall a dispatch, double click it and the record will be displayed on the Dispatch Entry screen.
Note: This is an excellent way to find open dispatches. If a customer calls in to check the status of the their dispatch, look for dispatches with no complete date. You can then drill down into the dispatch to see the promised date and time or look up other data such as the status of parts ordered for the dispatch, etc.
Invoices & Quotes
This panel displays a complete list of all invoices, credit memos or quotes ever created for this location. Unlike the Aging Balances panel, the invoices listed here will only be the ones that attached to this location. Records are sorted in reverse date order with the most recent items at the top. The sort order can be changed by clicking any of the headings. Click the same heading twice to sort by that column in reverse order.
Double click any line item to recall the record so it can be changed or viewed in more detail.
Note: Using this panel is the fastest way to find and recall a quote when a customer calls in to accept it.
Agreement Summary
This panel displays a quick overview of the agreements at the customer's location. This includes crucial data such as the next service date and agreement type.
The word "multiple" will appear in the agreement field if the customer has more than one service agreement. If multiple service agreements exist, view the Agreement Detail frame to get the full details of each agreement.
You can recall the agreement by clicking the Agreement number if you need to change anything or view it in more detail.
Agreement Detail
When the Agreement Summary panel does not give you enough information, turn to the Agreement Detail panel instead. It will show you every task associated with every service agreement for the selected customer's location. This is perfect for looking up the details of customers that have more than one agreement. It will also show usage for each agreement.
Attached Documents
This panel will show you all the documents that have been attached to this location, regardless of the ESC module where they were originally attached. Double click on any document to open it up in the program associated with that file type on your computer. See the topic entitled Attaching Files for more details on attached documents.
Sort Codes
This panel will show all the sort codes associated with the currently selected customer's location. This information can be quickly modified on the Sort Code tab of the Customer Entry screen by pressing ALT+M or selecting Activities | Edit Customer Information.
Custom Fields
This panel will show all the custom fields associated with the currently selected customer's location. This information can be quickly modified on the Additional Info tab of the Customer Entry screen by pressing ALT+M or selecting Activities | Edit Customer Information.
Button Breakdown

Clear Button
Click this button to clear the screen.
Activities Button
Click this button to display a list of activities you can perform with this customer's record. Selecting any of these activities will carry the currently selected customer to the appropriate screen so you don't have to search for them again.
Customer Button
If a particular customer cannot be found by searching, they might not have been entered through the Enter Customers screen. Click on the Customer button to display the Enter Customers screen, then enter the customer and click SAVE.
If a customer has been located and displayed on the Qualification Screen, clicking on the Customer button will display the customer on the Enter Customers screen.
Dispatch Button
After a customer is located and viewed here on the Qualification screen, clicking on the Dispatch button will carry the customer's information to the Dispatch Entry screen so you can easily create a dispatch for them.
Statement Button
Click this button to view a detailed statement for the currently selected customer.
Collect Button
Click this button to display the currently selected customer on the Customer Collection screen. This will allow you to see your past collection efforts for this customer and perform new collection actions.
QuickBooks Note: QuickBooks keeps track of the customer's receivable balance. Because of this, invoices that have not been posted to QuickBooks will not appear on statements or display in the Customer Collection screen.
Peachtree Note: Peachtree keeps track of the customer's receivable balance. Because of this, invoices that have not been posted to QuickBooks will not appear on statements or display in the Customer Collection screen.
Refresh button
Click this button to refresh all the panels on the screen. This can be handy if you have drilled down and changed any of the information shown here.
 Search for Customer screen
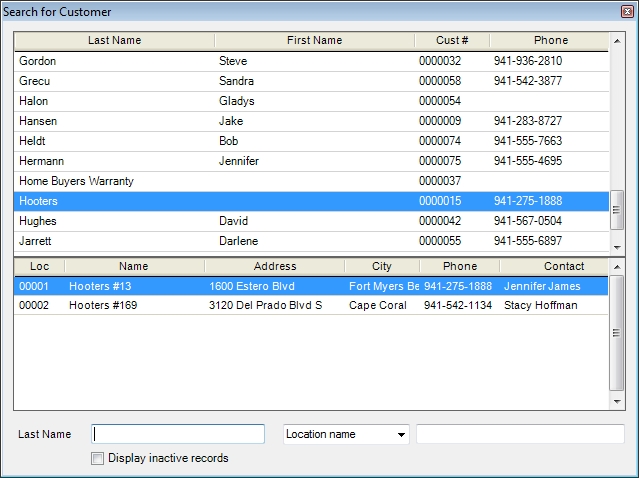
 How do I get to this screen?
 Related Topics