Sales Invoicing Field Overview
![]()
Invoice Form
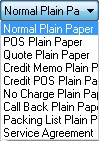
This button will display the Invoice Properties screen, which is used to select the invoice form that will be used for each invoice type. Clicking on this button will take you directly to the Invoice Properties screen. Invoice types are listed in the drop-down box directly below the Invoice Form button (Normal Plain Paper, Normal Form, POS Plain Paper, POS Form, Quote Plain Paper, Quote Form, Credit Memo Plain Paper, Credit Memo Form, Credit POS Plain Paper, Credit POS Form, No Charge Plain Paper, No Charge Form, Call Back Plain Paper, Call Back Form, Packing List Plain Paper, and Packing List Form). You may even create your own custom invoice forms in the Layout Designer, and those will also appear here in the list of invoices. A different invoice form may be selected and saved for each invoice type.
Clerk
This field is used to enter the technician number of person creating the invoice. Enter the two-digit technician number or the technician’s Search Code and press the TAB key. Technicians and employees can be entered, viewed, and modified on the Technician Setup screen, located under the Dispatch, Enter Technicians screen.
Dispatch Number
This is an optional field that can be used to enter the number of the completed dispatch that is being invoiced. When this number is entered, customer and dispatch information is brought over from the work order to fields here on the Sales Invoicing screen:
If the dispatch number is not known, click on the magnifying glass to the right of this field. This will display a list of all dispatches that have been completed within the last 30 days for which an invoice has not yet been created. Double-click on any dispatch to select it. When the invoice is saved with the dispatch number in this field, that dispatch will not appear in the drop-down list on any invoice in the future.
The Service Request Codes and Notes from the dispatch may be added automatically to the sales invoice when the dispatch number is entered into this field. In the Company | System Setup | Dispatch screen, options may be enabled which allow the printing of the Service Request Codes and Notes from the Dispatch Entry screen on the invoice, and also the to post the Notes from the Dispatch Entry screen to this customer’s Service History. When Notes are printed on the sales invoice, they appear in the Description fields as shown below.
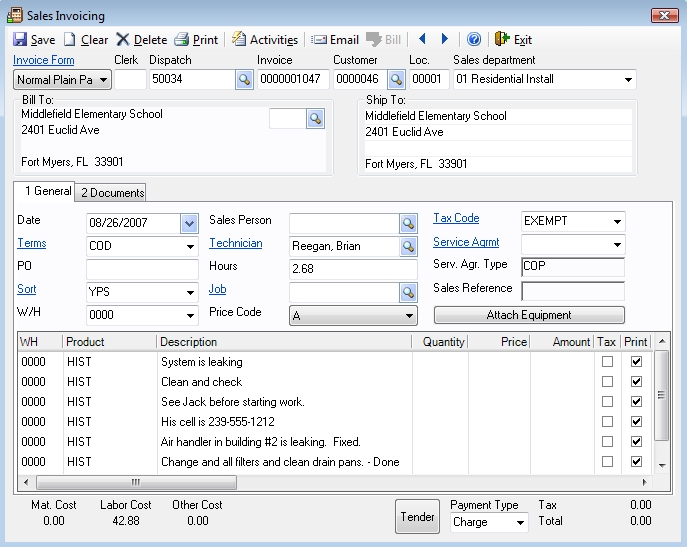
Invoice Number
Enter an invoice number to be used. This may be a pre-assigned invoice number that the technician used when he finished the call, or it can be automatically assigned to the next invoice number, as set by the internal counter by pressing the TAB key. The invoice counter can be changed from the Set Invoice Counter screen. To recall an existing invoice after it has initially been entered and saved, enter the invoice number here, and the invoice record will be displayed on the screen for viewing, editing, or deleting. If changes are made to an existing invoice, click on Save button to keep the changes.
If a dispatch number has been entered into the previous field, and if that dispatch has been completed by entering an invoice number at that point, that invoice number will be displayed here in the Invoice Number field. If no invoice number was entered when completing the dispatch, the invoice number that is used here on the sales invoice will be written to the completed dispatch, while changing the status of the dispatch to "Invoiced".
Customer Number
If a valid Dispatch Number has already been entered, the customer number and location fields will be filled in automatically.
If a dispatch number has not been used, recall the desired customer number by entering the customer number. If this number is not known, type in the beginning of the customer’s company or last name and press the TAB key or click on the magnifying glass icon. A search screen will be displayed. The first customer that matches what was typed will be highlighted. Click the desired customer or use the arrow keys to highlight the line. If the customer’s name does not appear in the list, use the up- and down-arrows to view additional customers. Click on the appropriate location in the bottom section to select it. Click OK to display that customer’s information.
Location
Use this field to enter the desired customer location. Press the TAB key while the field is blank to select location 00001. When the cursor enters this field, the customer’s aged receivables balance will appear underneath. Use this to ensure that Point-of-Sale customers do not have a large outstanding balance before completing the sale.
Department
This field is used to select the sales department that receives credit for the agreement. Click on the down-arrow key to the right of this field to see a full list of available departments. Click on the desired department to select it. To set up a new department, see Sales | Enter Sales Departments. For more information about departmentalization, see the Departmentalizing Your Chart of Accounts help screen.
Invoice Date
Today’s date will appear in this field when first entering the screen. To use a different date, enter it using a six-digit format. Example: 010202 for January 2, 2002. This is the date that the Terms will be based off of to determine the Due Date of the invoice, which is reflected in areas such as Statements, Aging Reports, and the like.
Billing Address
This area will display the address from the master billing information section of the Enter Customers screen. If a different location should be billed, click on the magnifying glass to display the locations for this customer. Double-click on the desired billing location to select it.
Ship To
This area displays the location name and address selected in the Location field. It may be edited by selecting the text with the mouse, then typing in the desired information.
Terms
The Terms that have been defined for this customer on the Customer Information screen will appear here. They may be changed for this invoice by selecting another from the drop-down list. To set up new Terms to appear in the drop-down list, click on the Terms button to the left of this field to display the Setup Terms screen. The Terms determine the due date of the invoice.
Purchase Order
Enter the customer’s purchase order number in this field. This number is required to save the invoice if the selected customer has the Require Purchase Order field set to "Yes" on their Customer Information screen.
Sort
Click this button to go to the Sales Sort Code setup screen. Sales Sort Codes can be added, modified, or deleted from this screen. Sales Sort Codes are for use with sales invoices, and sales reports can be generated and selected by the Sales Sort Code. Note that the Sales Sort Code is different from the Sort Codes that can be entered per customer on the Customer Information screen.
A Sales Sort Code may be set up for any customer on the Customer Information screen, and it will appear on the Dispatch Entry screen when creating a dispatch for this customer. If that dispatch is invoiced here on the Sales Invoicing screen by using the dispatch number in the Dispatch field, the Sales Sort Code will travel from the dispatch to the Sales Invoicing screen. It may be changed here at any time before saving the invoice, and new Sales Sort Codes may be created and selected by clicking on the Sort button to the left of the field.
An example of a use for the Sales Sort Code: Your city might be divided into several municipalities, and each of them might require you to furnish them with sales numbers for work that was done in their area. Sales Sort Codes for each of these municipalities may be set up, and one code may be assigned to each customer on their Customer Information screen. When that customer is invoiced or dispatched, that Sales Sort Code will appear in its field.
W/H
When entering an invoice the default warehouse, as set on the Inventory tab of the System Setup screen, will display here. Click on the down-arrow to display a list of all warehouses that exist in the system. Double-click on the desired warehouse to select it. New warehouses can be added from the Enter Warehouse screen. The Warehouse selected in this field will be the default warehouse for each line item that is entered on this invoice, but on each line item, the warehouse may be changed for that item.
Salesperson
Enter the employee number of the person who sold the items and services shown on this invoice. Enter the two-digit employee number or the employee’s Search Code to select the salesperson. If neither item is known, click on the magnifying glass icon to the right of this field. This will display a list of all employees. Click on the desired employee and then click OK. If an employee or salesperson doesn’t appear in the list, enter them in the Enter Technicians screen. Sales Reports may be run by Salesperson so that each member of your sales staff can receive a report showing only their sales.
Edit Technician Button
Click this button to go to the Sales Technicians screen. From this screen additional technicians can be added to the invoice.
Technician

This field is used to enter the employee number of the technician that performed the work on the dispatch being invoiced. Enter the two-digit employee number or the employee’s Search Code to select a technician. If neither item is known, click on the magnifying glass icon to the right of this field. This will display a list of all employees. Click on the desired employee and then click OK. Leave this field blank for POS invoices. If a completed dispatch is selected in the Dispatch field at the top of this screen, the technician will be displayed in this field along with the hours that they have worked on the dispatch. When a technician is selected by tech number or by clicking on a tech in the list, their first and last names will appear in this field. In order for the names to appear here, they must have been entered in the Last Name and First Name fields of the Address Information tab of the Enter Technicians screen. A comma may appear in this field if a Last Name and First Name have not been entered.
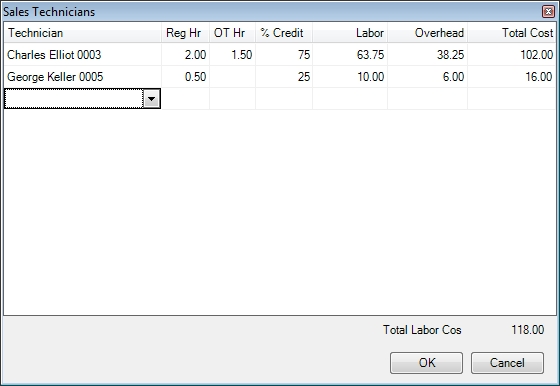
This screen is used to enter and show which technicians worked on the current invoice and the associated labor costs. If the invoice is being created from a dispatch the times each technician spent in a working status will appear on this screen automatically. Additional technicians can be added or deleted at this time and their times can be changed using the following fields:
Hours
Enter the number of hours that the displayed technician worked on this call. The program will multiply his pay rate by the number of hours to display the Labor Cost at the bottom of the invoicing screen. If no Labor Cost appears in its field in the lower left corner of this invoicing screen, check the technician on the Enter Technicians screen.
Job Number
Use this field to associate a job with the currently selected invoice. This will allow you to export this information into other accounting programs to provide accurate profit tracking. Click on the magnifying glass to the right of this field to see a list of all jobs for this customer. Double-click the desired job to select it. If you are creating an invoice from a Quote toward a particular job, as described in the Progressive Billing topic, that job number that is selected on the Quote will appear here.
Price Code
This field will automatically be filled in with the customer’s Default Price Code that has been set for this customer on the Customer Information screen. To change the price code for this invoice, click the down arrow button to the right of this field. Select the desired price code by clicking it.
Tax Code Button
Click this button to go to the Enter Sales Tax Codes screen. Tax codes can be added, modified, or deleted from this screen.
Tax Code
Tax codes allow the automatic computation of tax on labor, material, service agreements, or other items. They control how much tax to add and what general ledger accounts to credit.
This field will automatically be filled in with the customer’s default Tax Code on the Customer Information screen. To change the tax code for this invoice, click the down-arrow button to the right of this field. Select the desired tax code by clicking it.
Service Agreement Button
Clicking on this button will display a listing of all service agreements in effect for this customer’s selected location.
Service Agreement Number
This field is used to display the customer’s service agreement number. To view a list of this customer’s agreements, click on the Service Agreement button to the left of this field. Double-click the desired agreement to fill this field. Service Agreements are entered into the system through the Enter Service Agreements screen.
Service Agreement Type
The service agreement type will automatically display after a service agreement is selected for this customer. If the customer has only one agreement for this location, the Type will appear here, as entered on the Enter Service Agreement screen. If this customer has multiple agreements for this location, click on the Service Agrmt button above to display all agreements.
Sales Reference
This data will automatically display after selecting a customer. The Sales Reference field here displays what has been entered on the Enter Customers screen in the Sales Ref. field.
Attach Equipment
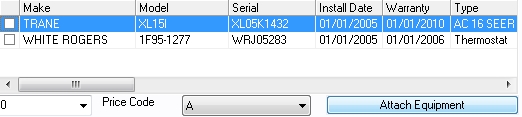
The Attach Equipment screen will be displayed (above) which shows all of the equipment that has been entered for that customer and location. One or more than one piece of equipment may be attached by checking the checkbox on the left side of the line item. Any column may be sorted in ascending order by clicking on the title of the column, after which an up-arrow will be seen to the right of the column title. Clicking the same column again will show a down-arrow, and the equipment will be sorted by that column in descending order. If any column is clicked for sorting, typing in a character will "jump" to that alphabetic point in the list. This makes it easy to locate a particular piece of customer’s equipment in a list that might contain dozens of items or more.
The purpose of attaching equipment to a sales invoice is to be able to track and show a history of invoicing on these particular pieces of equipment on the Qualification screen, printed dispatches, and Equipment History With Equipment reports.
This customer’s equipment and service procedures on this attached equipment may also be printed on the service dispatch ticket by checking "yes" on the "Include Equipment History" option on System Setup, Dispatch. This screen may be accessed the Company menu, System Setup, then clicking the Dispatch button.
Warehouse
This field is used to set the warehouse that the part on this line was taken from. This field will automatically be set to the Default Warehouse specified on this invoice.
Product / Code
This field is used to enter inventory items, billing codes, and history codes. If the part number or code is known, enter it here and press the TAB key to go to the next field. If the part number or code is unknown, click on the magnifying glass, or press ALT+DOWN ARROW, to display the following screen:
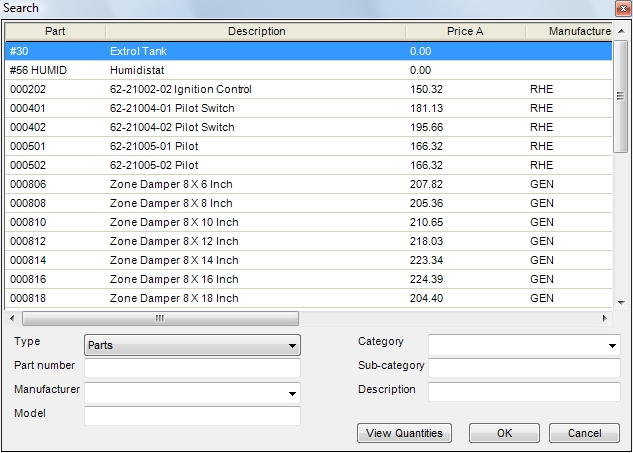
This screen will allow you to search for inventory items by Part Number, Category, Manufacturer, Model Number, Billing Code, or History Code. The Query tab will allow you to search all of these fields at once but it is considerably slower than the other search methods. Choose the appropriate search method by clicking on the desired tab at the top of the window. Then enter the beginning of the desired information to jump to the first record that matches it. Double-click the desired part to add it to the invoice.
If the selected part is a serialized item, as set in the Part Type field of the Inventory Entry screen, you will be given a list of available serial numbers from which to choose.
If you select a part that Posts to Equipment, you will be prompted to enter the warranty expiration date. This will be calculated automatically by adding the number of months in the Suggested Warranty field to the Invoice Date. To change the expiration date, enter the desired date in the 6-digit format. Example: 061402 for June 14, 2002.
Flat Rate Pricing: If an inventory part is selected that has been set up on the Inventory Entry screen with Flat Rate Pricing, a series of buttons will appear at the bottom of the invoicing screen:
You may select which type of Flat Rate you wish to apply to this inventory line item. This inventory part may be billed with normal marked-up pricing (No FRP), or any of the other types of Flat Rate calculations may be applied. Click on the particular pricing you wish to apply to this part, and the selling price and amount will reflect that calculation. If there is one part already listed on the current invoice which is using the Primary Repair price, the next Flat Rate part that is selected will automatically select the Additional Repair button and price selected. This may be overridden at any time, and any Flat Rate Price may be selected.
History Codes
The selected customer’s history can be automatically updated by adding History Codes in the Product / Code field. To view a list of all history codes, click the magnifying glass icon in the Product / Code field and select the History tab, or press ALT+H. Enter the beginning of the desired code to jump to that item on the list. Double-click the desired code to select it.
If the history code has an associated Usage Type, a prompt will appear so that an amount may be entered. Enter a positive number here for amount added, and a negative number for amount recovered. These amounts are available for printing on the Usage Report in Service History.
Billing Codes
Billing Codes include labor, trip charges, permits, and other non-inventory items that should be charged to the customer.
Special Billing Codes can be added to the invoice by entering them in the Product / Code field. To view a list of all billing codes, click the magnifying glass icon in the Product / Code field and select the Billing tab, or press ALT+B. Enter the beginning of the desired code to jump to that item on the list. Double-click the desired code to select it.
Special Codes
There are special codes that can be used in the Product / Code field:
DESC Description
Enter this code to be able to type notes in the Description field of the invoice. If the notes will not fit on a particular line, they will continue onto the next automatically. Notes that are entered with the DESC code are saved with the invoice, and they will be printed on the invoice, but they won’t be sent to this customer’s service history. For notes to be saved, printed, and sent to service history, use the HIST code below.
HIST History
This code works identically to the DESC code except that the notes entered will also be applied to the customer’s history record. In addition to being sent to history, these notes will also be saved with the invoice, and they will appear on the printed invoice.
SUB Sub Total

When a SUB billing code is entered on the Sales Invoicing screen, a sub-total line item will be created that will display a total of all line items that appear above it. For example, if you wish to enter a number of lines of inventory items, and if you wish to show a sub-total of that material before the labor is added, use SUB to add the inventory items. Additional lines may then be entered below the SUB line, such as additional charges or fees.
Description
After selecting an inventory part or using a special billing code in the Product / Code field, the description will be displayed here.
Quantity
Enter the quantity to be billed, and the program will extend the selling price and also update the material cost in the lower left corner of the screen. The tax will automatically be computed in the lower right corner of the screen.
Unit Price
This field is used to display the price of a single item. This figure will be automatically filled in when the Product / Code is selected. This field can be manually modified.
Amount
This field is used to display the total price of all items on this line of the invoice. This figure will be automatically filled in when the Product / Code and Quantity fields are entered. This field can be manually modified.
Tax and Print
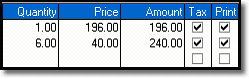
On each line item, there is a Tax checkbox and a Print checkbox. Any line item may be included or excluded from being included in the tax computation for the invoice, and any line item may be included or excluded as a printed line on the printed invoice. Click each checkbox to check or uncheck it.
For ease of use, below are the keystrokes and explanations that will assist you in entering parts, billing codes, history codes or assemblies in the body of the sales invoice:
To Insert or Delete a Line on the Invoice
Inserting a new line between others: With the mouse, click anywhere on any line item, and press the Insert key to create a blank line at that point. Enter inventory, billing codes, or service history codes as normal. Saving the invoice will also store the changes.
Deleting a line: With the mouse, click anywhere on any line item, and press the Delete key to remove that line from the invoice. Saving the invoice will also store the changes.
Material Cost
This field displays the total cost of all material that is used on the invoice. This information comes from the Average Cost of each item entered on the invoice. It also comes from any "Material" type Billing Codes that are used on the invoice.
Labor Cost
This field displays the total cost of all labor entered on the invoice. This information is derived from multiplying the Hours Worked by the technician’s hourly wage. The technician’s wage can be viewed and modified from the Enter Technicians screen.
Other Cost
This field displays the total "Other" cost. This information comes from any "Other" type Billing Codes that are used on the invoice. If a billing code is created in the Enter Billing Codes screen, and if the Type is set to "Other", and if there is a cost debit and cost credit account number on the Billing Code, a prompt for the cost will be displayed when using that Billing Code on a sales invoice. If cost is entered on that prompt, it will be multiplied by the quantity entered to be shown as the "Other Cost".
Tender Button

Click this button to display the Tender screen. The Tender screen allows the recording of payments immediately here on the Sales Invoicing screen without the need of switching to the Receivables Payment screen. This is especially useful when the system is being used in a counter sale situation where cash, charge or check payments may be applied to the sale at the same time the invoice is created.
Payment Type
Cash Invoice: When saved, this invoice will post to the customer’s Accounts Receivable account along with a cash payment record. This payment type is used for a quick sale for a customer without the need for applying cash received in a separate step in AR. No check number may be applied to this invoice on the AR Payments Screen. If you wish the check number to appear on the customer’s statement and the AR Payments Report, select Charge here, and then apply the check normally on the Accounts Receivable Payments Screen.
Charge Invoice: When saved, this invoice will post to the customer’s Accounts Receivable account as an open invoice with no payment. This is used when the payment has not been received yet from the customer, or if it is a cash sale where you wish to apply the check number for detail.
On Hold Invoice: When saved, this invoice does not appear on the customer’s Accounts Receivable Payment Screen or statement. A customer may wish for you to come out next week, for example, to perform additional work, and then to bill both visits on the same invoice. On the Sales Report, this invoice will show a zero amount in the "A/R Post" column as long as it remains on hold. When the invoice is ready to be released to Accounts Receivable, recall the invoice by clicking in the Invoice Number field, then typing in the invoice number. Change this field from "On Hold" to "Charge" (or "Cash"), and then click on the Save button. The "A/R Post" column for that invoice will then display the amount of the invoice, and the open invoice will appear on the customer’s payment screen.
Also, invoices that are generated from the Service Agreement module may be put on "hold" status. The purpose of this is to prevent many invoices from appearing in Accounts Receivable when you don’t know if the customer will renew their service agreement with a payment. When a payment for a service agreement renewal is received, recall the invoice on the Sales Invoice Entry screen, and change the Payment Type field from "On Hold" to "Charge" (or "Cash"), and then click on the Save button.
Tax
This field will display the total tax due on the currently displayed invoice. The tax amount is determined by the tax code used on this customer. To change the tax rates, and how the tax code computes its tax (labor, material, service agreement, etc.), go to Sales | Enter Tax Codes, or click on the Tax Code button to the left of the tax code field on the top part of the Sales Invoice Entry screen.
Total
This field will calculate and display the total amount due, including tax, on the currently displayed invoice.
Activities Button
Edit Customer Information
Select this option to save the invoice and display the customer it was for on the Customer Entry screen. This can be very helpful for updating phone numbers, sort codes, custom fields, etc.
Create/Recall Dispatch
This option will save the invoice and recall the dispatch that is attached to it. If no dispatch is attached to the invoice a new dispatch will be created instead. All parts on the invoice will be brought over to the dispatch and the dispatch and invoice will be associated with each other. This can be particularly helpful when used in conjunction with quote type invoices.
Example: A quote is created for work that a customer wants performed. After the customer accepts the quote, select this activity to create a dispatch to perform the work. Once the dispatch is complete simply change the quote to a normal invoice.
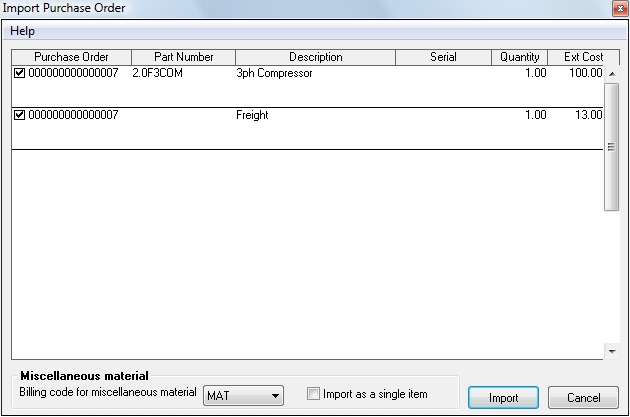
Import Purchase Order
Select this option to import parts from any purchase order. Select the purchase order to import the parts from using the Search for purchase orders screen. Once you have selected the purchase order you will see a list of the parts on it. Remove the checkmarks from items you don't wish to import. If you want to import a quantity less than your received, leave the checkmark on the line then manually change the quantity on the invoice after it has been imported.
If you want to import any of the items on the purchase order that were listed as Accounts rather than Items you will need to associate the item with a Material type Billing Code. If there is more than one of these items you will have the option to import them as a single line item on the invoice.
Import Parts Received to a Job/Dispatch
This activity is identical to importing a purchase order but it only works with purchase orders that were previously attached to the dispatch or job being invoiced. As an additional restriction, only parts that have been received will show Import Purchase Order screen. This ensures you are only importing parts that have been received in and been specifically set aside for this job or dispatch.
Import Mobile/Web Invoice
Clicking the Import Mobile Invoice option will display a list of invoices that have been created by techs in the field and sent back via their mobile unit. Using the Mobile Server and Client software, technicians can generate invoices and receive payments while at the customer’s site. They can enter invoices, apply payments, generate invoices, and send the data back to the main computer at the office. All invoices that have been created in this manner will be displayed in this list.
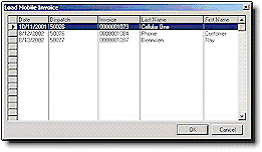
After selecting an invoice from this list, it is displayed on the Sales Invoicing screen to be viewed and modified, if needed. Additional items and service history may be added to the invoice before clicking on the Save button to save the invoice. If the technician in the field has collected payment for the invoice, that payment will automatically be applied to this customer’s receivable account.
View Ordered Parts
Select this option to see a list of all the parts that were ordered for this invoice. This will include all purchase orders created using the Order Parts activity as well as purchase orders entered directly on the Enter Purchase Order screen. Look at the Quantity Received field to see if the parts have arrived yet or click the Open button to see purchase order created for that line item.

Order Parts
See the topic entitled Creating Purchase Orders from a Dispatch or Quote.
Bill Button
This button becomes active when a Quote is entered (instead of an invoice), and an existing job number is entered or selected in the Job Number field. The Bill button is used for Progressive Billing. Click here for a complete explanation of Progressive Billing.
Email Button
This is used to send the current invoice to the customer's email address in PDF form. See the Emailing Invoices help screen for more information.
Previous Invoice/Next Invoice Buttons
![]()
These options are used to cycle through invoices. Clicking the left button will pull up the invoice number prior to the current invoice number, while the right button will pull up the next invoice number in the number sequence. If there is no invoice pulled up in the invoicing screen, pressing the left button will pull up the invoice with the highest invoice number, and the right button will retrieve the invoice with the lowest invoice number. Note that these buttons will only retrieve invoice numbers that have been saved into the system; if a number was not used, the arrows will bypass that invoice number.