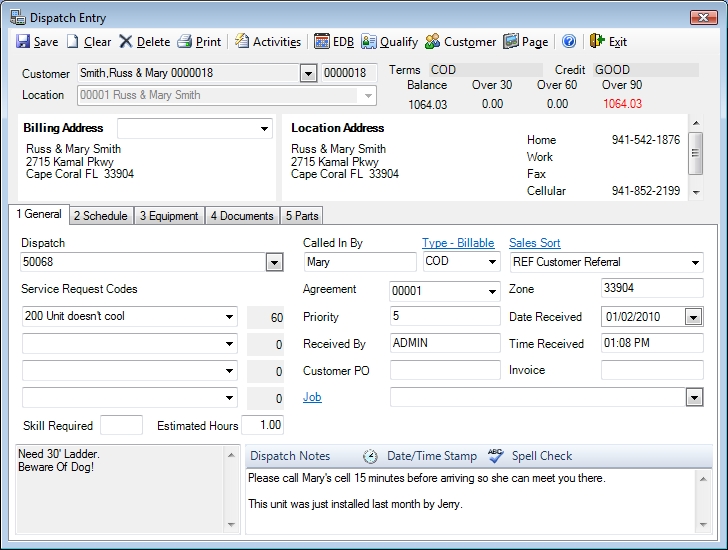
All service calls are entered here on the Dispatch Entry screen. All information about who called, the problems they are having, and who is assigned to fix their problems is entered on this screen.
The Dispatch Entry screen displays the customer information at the top of the screen. The bottom of the screen is divided into five sections with a tab for each:
1 General: This tab (activated by clicking on it or by pressing ALT-1) displays the Service Request Codes, descriptions and times, Date and Time Received, Job Name, Dispatch Notes, and various other fields.
2 Schedule: This tab (activated by clicking on it or by pressing ALT-2) displays the scheduling information for the dispatch, such as tech, date and time promised, and status of the call.
3 Equipment: This tab (activated by clicking on it or by pressing ALT-3) displays a list of all the equipment currently installed at the customer's location. It allows you to select which pieces of equipment will be worked on during this dispatch. You also have the ability to edit or add new equipment on the fly.
4 Documents: This
tab (activated by clicking on it or by pressing ALT-4)
displays a list of documents that have been attached to the dispatch.
It also
gives you the ability to recall those documents, delete them or add more.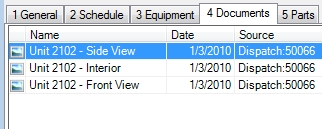
5 Parts: This
tab (activated by clicking on it or by pressing ALT-5)
displays the parts that have been attached to the dispatch.
Note: If you have your monitor set to a very low resolution it is possible that the dispatch notes will also display on a separate tab.

Customer
To search for a particular customer start entering the customer's name and the field will fill with the customer that is the closest match.
To search by anything other than name, click the pull down arrow on the right of the field to get the full customer search screen. Customers may be searched by Customer Name, Location Name, Location Address, Location Street, Phone Number, Email, Equipment Serial Number, Equipment ID or Contact Name. When a customer is located, all locations for that customer are displayed in the grid on the bottom part of the search window. The location for which the call is being generated may be selected by double-clicking on that line.
Speed Tip: The TAB key can also be used to switch sections. The up- and down-arrow keys will highlight items within the section and the ENTER key will display the customer’s information.
You can also bypass the customer name field and enter the customer's number, if known, directly in the field to the right of this one.
Receivables
This area will automatically display the selected customer’s total outstanding receivable balance. The amounts displayed in this area are the total of all receivables due for all of the customer’s locations.
Data in this area cannot be modified from this screen. This balance is updated every time a payment is made in the Enter Payments screen in Accounts Receivable, and whenever an open invoice is generated through the Sales Invoice Entry screen. If QuickBooks 2003 or later is set for the accounting interface, payments are made through that package. The aged Receivable totals are then read back into ESC to be displayed here.
Location
This field is used to enter and display the customer’s location. If the customer and location were selected from the customer search list (displayed by clicking on the magnifying glass on the Customer field), this number will be filled in automatically unless the customer’s number was manually entered in the Customer field.
Location Address
This area shows the name and location where the customer needs to have the work performed. It includes the location’s name, address, phone numbers, and contact as shown on the Customer Information screen. This screen can be reached by clicking the Customer button at the top of the screen. This information is set by the Location field and cannot be manually edited from this screen.
Terms
This field will automatically show the selected customer’s payment terms. This information cannot be modified from this screen. It can only be modified from the Customer Information screen.
Billing Location
This field is used to enter and display the location where the invoice should be sent for the current dispatch. This field is blank by default, which selects the customer’s master billing address. The billing address can be changed to any of the customer’s existing locations by selecting them using the drop down.
Billing Address
This area displays the selected customer’s billing address. This area defaults to the customer’s master billing address but can be changed by using the Billing Location button. It cannot be edited directly.
1 General
Assign a New Dispatch Number
Pressing the TAB key while this field is blank will cause the software to automatically assign a dispatch number to this service call.
Displaying an Existing Dispatch
If all other fields are left blank, an existing dispatch can be recalled and displayed by entering the full dispatch number without any leading zeros and pressing the TAB key.
Search for an Existing Dispatch
You can also use this field to search for existing dispatches by clicking the pull down or pressing Enter in this field. This will display the Dispatch Schedule screen.
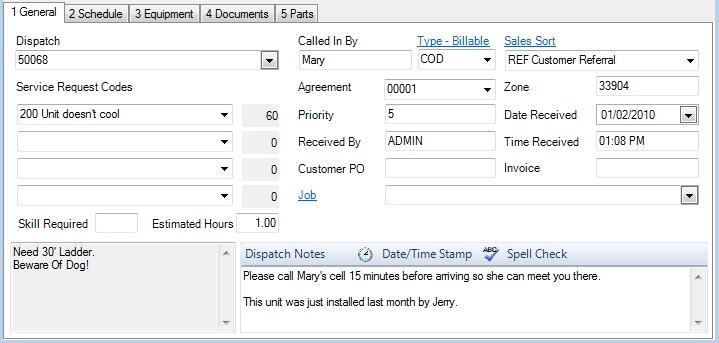
Called In By
This field is used to enter and display the name of the person who placed the call for service. It can only be edited from the Dispatch Entry screen. This field is shown on the Electronic Dispatch Board (EDB) as the Contact.
Type
This field is used to specify whether a dispatch should be billable or not. When a billable Dispatch Type is used on a dispatch it will immediately change the label above it to let you know this is a billable dispatch. Later, when the dispatch is completed, it will appear in the list of dispatches to be invoiced on the Sales Invoicing screen. The list can be seen by clicking Add New | Create from Dispatch on the Sales Invoicing screen.
If a non-billable Dispatch Type is used on a dispatch, it will not appear in this list after it has been completed. This can be ideal when creating dispatches to create quotes or track a technician's time off.
The default value can be set on the Company | System Setup | Dispatch setup screen.
Sales Sort
A sort code may be selected here for this dispatch that has been entered into the Enter Sales Sort Codes screen in the Sales module. When the number of this dispatch is referenced in the Dispatch field of the Sales Invoicing screen, this sort code will appear in the Sort field of the invoicing screen. This will eliminate the need to re-enter the Sales Sort Code again on the Sales Invoicing screen. The purpose of a Sales Sort Code is to be able to print a sales report by the code. For example, your city might be divided into taxing districts, each of which requires their own sales report. If the Sales Sort Code is set on the Customer Information screen, it will follow the customer to the dispatching and invoicing step. It can be changed here on the dispatch screen, if desired. Sales reports may then be run by the Sales Sort Code if a sales invoice is created and referenced to this dispatch by the dispatch number field on the Sales Invoicing screen.
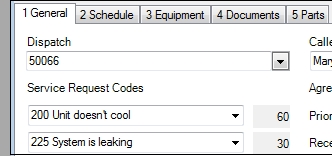
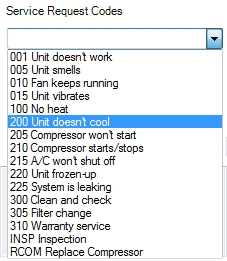
Service Requests
These fields are used to display the reasons that the customer is requesting service. They are not required but adding them can save you extra time by letting the tech know what needs to be done without typing in the dispatch notes field.
To modify any of these values or set up new service request codes, go to the Enter Service Request Codes screen. This screen can be reached by pulling-down the Dispatch menu, and then clicking Enter Service Request Codes.
Skill Required
This field will automatically show the highest skill level needed to complete all the service requests that have listed in this dispatch. This information can be used to make sure that the dispatch is not assigned to someone who can’t complete it. The Skill Required can be changed manually by clicking in the field, entering the desired skill level, and pressing the TAB key.
The skill level associated with each service request code can only be edited from the Enter Service Request Codes screen. This screen can be reached by pulling-down the Dispatch menu, and then clicking Enter Service Request Codes.
Estimated Hours
This field will automatically show the estimated number of minutes needed to complete all the service requests used in the dispatch. This allows the dispatcher to make sure that technicians are not assigned more work than they can complete. This field will total all times for service requests codes that are used above. In addition, this Estimated Hours field may be edited by clicking on it, and then typing in the desired hours.
The estimated time associated with each service request code can only be edited from the Enter Service Request Codes screen. This screen can be reached by pulling-down the Dispatch menu, and then clicking Enter Service Request Codes. These times for service request codes are estimates only that are based on individual experience, and they are for reference only.
Agreement
All existing service agreements for this customer and location may be selected in the drop-down list as a reference. If an existing service agreement is selected here, and the dispatch is marked as "Complete" at some point, the Date Last Serviced field on the Service Agreement Entry screen and the Qualification screen will be updated with the completed date. If you are viewing a dispatch on this screen, and if the dispatch was created from the Post Schedule to Dispatch screen, this field will display the service agreement number that created it. If the dispatch was created any other way, this field will be blank.
Priority
Priority is used to help control the order calls are displayed on the Electronic Dispatch Board (EDB). The EDB can be reached by clicking the EDB button at the top of the screen. The lower the number, the higher they are placed on the EDB. The default priority for the Dispatch Entry screen is set up on the Company | System Setup | Dispatch screen – a good default is "2". Dispatches that are posted through the Service Agreement module are automatically assigned a priority of 8.
This feature only affects calls that have the same Date Promised and Time Promised. Example: assume that the following dispatches have been entered.
|
Dispatch Number |
Date Promised |
Time Promised |
Priority |
|
00001 |
12/01/02 |
10:00:00 |
2 |
|
00002 |
12/01/02 |
10:00:00 |
1 |
|
00003 |
12/01/02 |
09:00:00 |
2 |
Dispatch #00003 would be displayed first on the EDB because it has an earlier Time Promised than the other two calls. Dispatch #00002 would be displayed second because even though it has the same Date and Time Promised as Dispatch #00001, it has a lower priority number. Dispatch #00001 would be displayed below the other two calls because its priority has a higher number than Dispatch #00002. The EDB would show the calls in this order:
|
Dispatch Number |
Date Promised |
Time Promised |
Priority |
|
00003 |
12/01/02 |
09:00:00 |
2 |
|
00002 |
12/01/02 |
10:00:00 |
1 |
|
00001 |
12/01/02 |
10:00:00 |
2 |
Received By
Enter the name of the employee who entered the dispatch (if you are the dispatcher logging the call, it will be your employee number). This can be entered manually, or the employee’s search code can be entered and their name will fill in automatically. The search code field is located on the Technician setup screen. This screen can be reached by pulling-down the Dispatch menu, and then clicking on Enter Technicians.
Purchase Order
Enter your customer’s purchase order number here. This field is only required if the Require PO field on the Enter Customers screen is set to Yes. If it is set to Yes, this field will be highlighted and the dispatch cannot be saved until something is entered here.
Zone
The zone field will be filled in automatically with the information associated with the selected customer. This information appears on the dispatch board to inform the dispatcher of the customer’s general location.
Date Received
This field is used to show when the service call request was taken. It defaults to the current system date when the dispatch is entered, but can be changed manually if desired.
Time Received
This field is used to show when the service call request was taken. It defaults to the current system time when the dispatch is entered. This field can be changed to a proper military time or a non-numeric description. Example: 14:00. As an alternative to entering a time in military format, enter the time with an "A" or "P" following. For example, "8a" will format to "08:00 AM", and "3p" will format to "03:00 PM" (without quotes).
Invoice
This field stores an invoice number that may be entered when the call is changed to a Complete status. A prompt appears where an invoice number may be entered. When recalling the Complete invoice at a later date, the invoice number will be seen here.
Entering the invoice number is not required when the dispatch is completed. When creating a sales invoice in the Sales Invoicing screen (F9), the dispatch may be selected in the Dispatch field. Upon saving the invoice, the status on the dispatch will be changed to Invoiced, and the invoice number that is generated (or entered) on the Sales Invoicing screen will be written into this invoice field for that call on the Dispatch Entry screen. If an invoice number is entered here on the Dispatch Entry screen when completing the call, and if this dispatch is selected in the Dispatch field of the Sales Invoicing screen, this invoice number will be used for the invoice rather than the Sales Invoicing screen generating a new one with its invoice counter.
Job
By clicking on the magnifying glass, a list of jobs will be displayed that have been set up for this customer through the Customer Info | Setup Jobs screen. If a sales invoice is created, and if this dispatch number is selected in the Dispatch field of the Sales Invoicing screen, the job number that has been selected here will also be displayed on the Sales Invoicing screen.
Location Notes
This area displays the location notes as shown on the Enter Customers screen for the currently selected customer. This screen can be reached by clicking the Customer button at the top of the screen. This information is set by the Location field and cannot be manually edited from this screen.
Dispatch Notes
Enter any additional information about the dispatch here. The notes entered here are saved with this dispatch only, and are not transferred to Customer Information, any other dispatch, or Service History. The notes on the Customer Information screen, however, are seen on all dispatches in addition to the dispatch notes for that individual work order. Type in this field normally. Example: Key under mat, phone numbers, or additional tasks to be completed on this call. When pressing Tab after completing this field, the 2-Schedule screen is displayed for this dispatch.
Click the Date/Time Stamp to put the date and time at the end of the current dispatch notes. This can be a great way to keep track of what happened when.
Click the Spell Check button to perform a spelling check on the contents of the Dispatch Notes. Even if you do not click this button ESC will still underline misspelled words in red so that you can correct them on the fly.
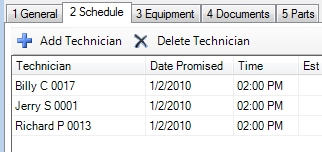
2 Schedule
The 2 Schedule tab lists the technicians on the dispatch vertically, and for each tech, it displays the Date Promised, Time, Est. Hours, Status, Dispatch Date, Dispatch Time, Dispatcher, Time On and Time Off. These fields will be automatically set as the status of the call is changed on the Electronic Dispatch Board. When a call is initially entered, the Technician is set to the Default Technician as determined on the Company | System Setup | Dispatch screen. The Date Promised is today’s date, and the Time (Promised) is the current time plus the Default Lead Time in Minutes as set in the Company | System Setup | Dispatch screen. The Time Promised to your customer should be entered as military time. This field defaults to a set number of minutes from the current system time.
The Est. Hours is the total of the times on all of the service request codes that have been entered on this dispatch. The default status when entering a dispatch is Pending. Other statuses may be used here when a call is initially being entered, but a call usually has a status of Pending after it is logged before it’s assigned to a technician. Statuses can be easily changed on the EDB, and the main statuses are:
All other fields are blank when a dispatch is entered because there are no other times generated by the call being changed to other statuses.
We recommend the default technician to be called "Unassigned" and to be set as the first technician on any Electronic Dispatch Board setup. Pending calls may then be seen at a glance on the left-most column on the EDB, and the calls may then be moved to other technicians from there. When creating a call, the tech is the default tech, but it may be assigned to any other tech at this time by clicking on the "…" button in the Technician field of the Schedule tab. This will display a list of your technicians that have been entered into the system through the Enter Technicians screen. Click on the desired tech.
Other fields on each schedule line are:
Dispatch Date
The date that this technician started traveling to the dispatch location is seen here. It is automatically set when the Dispatched status code is used. This field can be manually changed if desired.
Disp Time
The time that the technician started traveling to the dispatch location is seen here. It is automatically set when the Traveling status code is used. This field can be changed manually if desired by entering the time in a military format (hh:mm:ss).
Time On
When this technician arrives at the dispatch location, the Time On time is stamped here. It is automatically set when the Working status code is used. This field can be changed manually if desired.
Date Off
The date that the currently selected technician finished working at the dispatch location is set here when the Completed status code is used. This field can be changed manually if desired.
Time Off
The time that the technician finishes working at the dispatch location is set here. It is automatically set when the Complete status code is used. This field can be changed manually if desired.
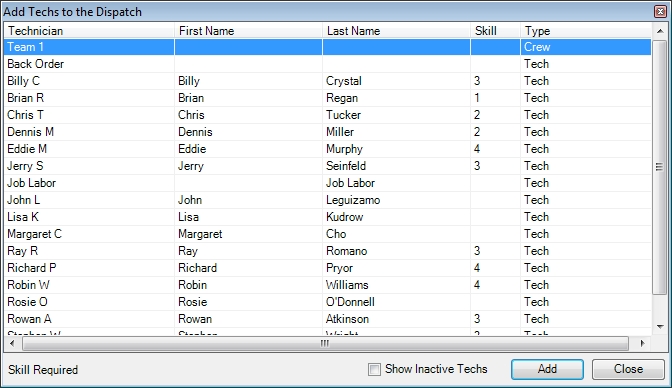
Assigning Multiple Technicians
More than one technician may be assigned to a dispatch by clicking the Add Technician button. Additional technicians added in this fashion will have the same promised date and time as the technician above them on the dispatch. This can be changed after closing the Add Technician window if desired.
Technicians that normally work together can be setup as a crew and selected from this window as well. See the Crew Dispatching topic for more details on how to create and use crews.
If more than one tech has been assigned to the call, the same call will appear in each technician’s column, and an asterisk ("*") will show to the left of the customer's name to denote that there is more than one tech on the call.
Deleting Technicians from the Dispatch
To remove a technician from the dispatch select the line you want to delete and click the Delete Technician button. Each dispatch must have at least one technician assigned to it so you will be unable to delete the final one.
Assigning a Technician to a Call for Multiple Days
There may be cases where you want to assign the same tech to a job for two or more days. To do this click the Add Technician button and select the desired technician. Now click on their name again and the same technician will be added to the dispatch for the following day with the same promised date, time and estimated time. Repeat this as needed to get the correct number of days assigned. Once that has been accomplished close the Add Technicians window and you can modify the promised date, time and estimated time if needed.
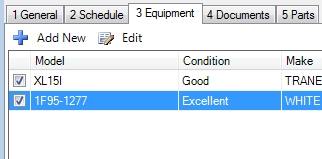
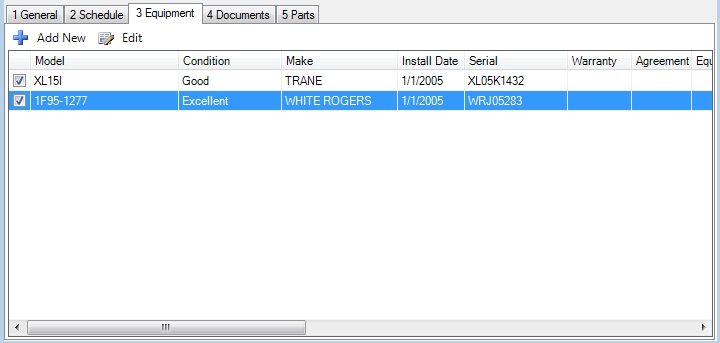
3 Equipment
Attaching Equipment
Pieces of a customer's equipment can be "attached" to a service dispatch by placing a checkmark next to the piece of equipment on this screen. This allows the equipment to be printed on the dispatch or sent to the mobile client. It also allows you to keep track of all the work performed on a piece of equipment.
You may also enter or edit equipment here by using the Add New or Edit buttons on the toolbar of the Equipment tab.
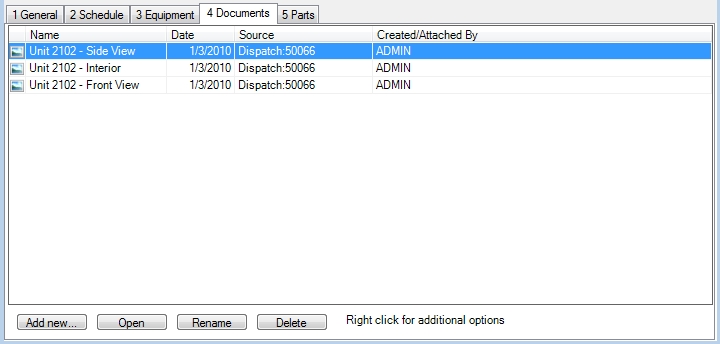
4 Documents
The Documents tab allows you to attach documents directly to the dispatch. See the Attaching Files topic for more detail on this powerful feature.
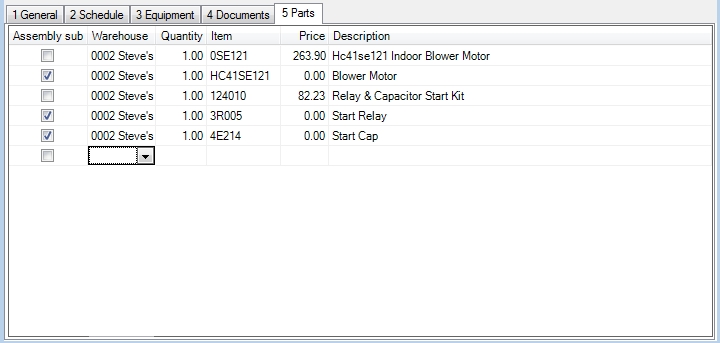
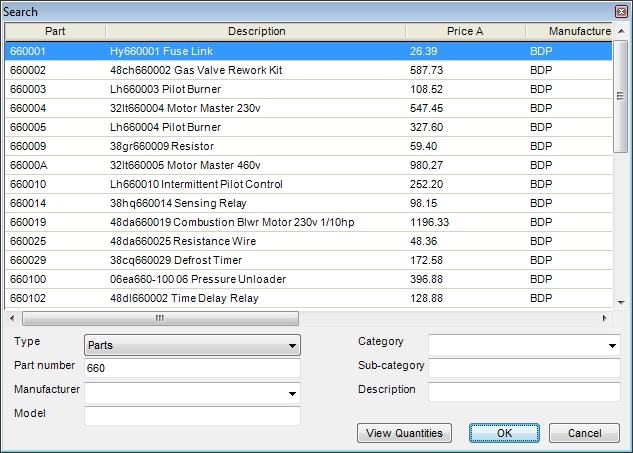
5 Parts
The Parts tab allows you to add parts, billing and history codes to the dispatch so that the technician has all the necessary parts before leaving for the job.
From this screen, select the warehouse that will be supplying the parts. Although the parts will not be removed from inventory at this time, this information will flow to the Sales Invoicing screen later when this dispatch is invoiced.
Set the quantity then enter the part number, billing code or history code in the Item field or click the button to the right of the field to display the standard Sales Search screen and select the desired item from there. Either method will automatically fill the Description field with the correct information.
If an assembly item is added to this tab an additional column named Assembly Sub will appear. All the sub assemblies associated with this part will appear on the following lines and a check mark will appear in this column indicating that the item is a subassembly. Removing this check mark will not affect the price of the assembly item when it is later invoiced, but it will cause the unchecked subassembly to appear on the invoice as a regular part with a regular price. We do not normally recommend removing the check mark for this reason.
The price field will automatically be filled in with the correct price for the part based on the customer's price code. Like most things, however, it can be manually changed here if desired. This may be necessary for call backs or warranty calls.
Of course, most of the standard functionality you are used to on the Sales Invoicing screen appears here as well: inserting and deleting lines, changing the Description of an item, adding Assembly parts. Some features, however, such as selecting serial numbers, assigning usage and changing prices have been disabled since we are not removing the items from inventory or billing the customer for them at this time.
The items you add on this screen will now print on the dispatch ticket. These parts will also automatically flow through to the ESC Mobile Client if it is configured properly. It is important to note that the parts entered here will not be sent to your technicians through the ESC paging feature or through the Xora integration.
Later on when this dispatch is turned into an invoice, these parts will be imported automatically onto the invoice.
The Activities Button
Display call on Dispatch Board
This option will save the changes made to the currently selected dispatch and then display the Electronic Dispatch Board. ESC will attempt to show the dispatch but may not be able to if you have configured the board so that it can not without changing your settings.
Example: The dispatch board is set to the 7 day view and the current date is set to today. If you select this option for a new dispatch you are creating that has a promised date of 10 days from now, it cannot be shown on the EDB because those days aren't displayed yet. Likewise, if you had the board set to the dispatch view and had the date mode set to Current and Previous it would not show because the dispatch is in the future.
Qualify a Customer
This selection will save the current dispatch and display the customer the dispatch is for on the Qualification screen. This can be handy when you want to find out more information about the customer.
Edit Customer Information
Select this option to save the dispatch and display the customer it was for on the Customer Entry screen. This can be very helpful for updating phone numbers, sort codes and custom fields.
Create an Invoice
This selection will save the current dispatch and create an invoice for it. If an invoice has already been associated with the dispatch it will be recalled instead.
Create a Quote
This selection will save the current dispatch and create a quote based off of it. This will not stop you from also creating an invoice for the same dispatch.
Display Statement
Select this option to see a statement for the currently selected customer.
Optimize Dispatch Into Route
See the Optimize Dispatch Into Route help topic for more details on how this powerful feature works.
View Ordered Parts
Select this option to see a list of all the parts that were ordered for this dispatch. This will include all purchase orders created using the Order Parts and Create a Purchase Order activities as well as purchase orders entered directly on the Enter Purchase Order screen. Look at the Quantity Received field to see if the parts have arrived yet or click the Open button to see purchase order created for that line item.

Order Parts
See the topic entitled Creating Purchase Orders from a Dispatch or Quote.
Create a Purchase Order
This selection creates a blank purchase order. Each line of the purchase order will be associated with the currently selected dispatch so it will be easy to see if the parts have been received by using the View Ordered Parts activity described above.
View Sub Tasks
Select this option to see any sub tasks that might be associated with the dispatch. Sub tasks will only appear on dispatches created through the Service Agreement module.
EDB Button
Click this button to display the Electronic Dispatch Board. If any changes have been made to the displayed dispatch, a Save prompt will appear before the EDB is displayed. Pressing the F5 key will also take you to the EDB.
Qualification Button
Click this button to display the Customer Qualification screen. If any changes have been made to the displayed dispatch, a Save prompt will appear before the Qualification screen is displayed. Pressing the F3 key will also take you to the Qualification Screen.
Customer Button
Click this button to display the Enter Customers screen. If any changes have been made to the displayed dispatch, a Save prompt will appear before the Enter Customers screen is displayed. Pressing the F2 key will also take you to the Customer Entry screen.
Page Button
Click this button to send the currently displayed dispatch to all assigned technicians. The exact information that is sent to the pagers can be setup in the Setup Paging screen. This screen can be reached by pulling-down the Company menu, clicking on System Setup, and then clicking Setup Paging.
Exit Button
Click this button to close the screen. This will cause the previously displayed screen to be shown. Any unsaved information will be lost.
 Customer Search screen
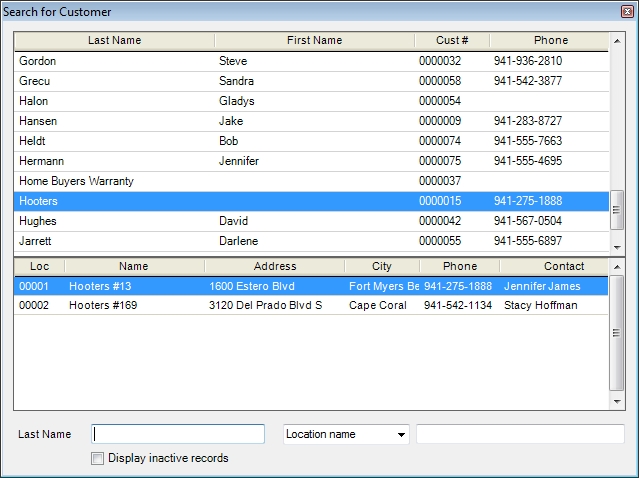

 How do I get to this screen?