This screen is used to set up jobs. A job allows you to accurately track all the costs and revenue associated with work you are doing for a customer. By entering a job on this screen, you can associate the job with an invoice entered on the Sales Invoicing screen and parts ordered and received on the Enter Purchase Orders and Receive Items screens. This information can be exported to an outside accounting program to get an accurate profit amount and percentage per job, as well as seeing if the estimated expenses and revenues match the actual amounts.
Jobs are generally only set up for projects that will involve multiple dispatches, invoices and/or purchase orders. Accurate profit tracking for jobs that have a single invoice can be accomplished by running a sales report from within the ESC software.
Creating a New Job
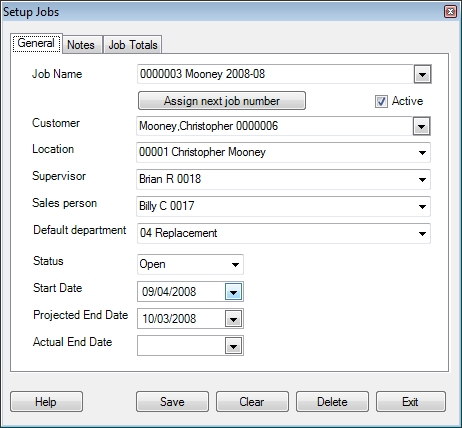
To create a new job click the Assign next job number button or manually type in a unique job name. Make sure the Active box is checked and assign the job to the customer. The job can also be associated with a location if desired. This can be helpful when identifying jobs if you do a lot of jobs for a particular customer that has many locations.
Peachtree Note: If you are considering integrating with Peachtree at some point during the course of this job keep the job name to 20 characters or less. Otherwise the job will not be synchronized with Peachtree when you do integrate.
At this point you can associate a supervisor and sales person to the job. The Supervisor field can be used to filter reports but has no other functionality. For example: By filling out the Supervisor field you can filter the Job Sales Report to show only jobs supervised by the desired person but dispatches created for that job would not automatically be assigned to the supervisor. The Sales person field, however, will automatically fill in the Sales Person field on all progressive invoices created for the job.
If you want all the transactions related to this job to default to a specific department, select one here before continuing.
If the job has been approved and will start shortly set the status to Open, otherwise use the Pending status. Set the Start Date and Projected End Date if you know them. Leave the Actual End Date blank for now.
If you would like to add any notes to the job you can do so on the Notes tab. This is a freeform text field that can be used for everything from phone numbers of job site inspectors to the status of permits needed for the job.
Click Save when you are finished.
QuickBooks Note: When a job is created in ESC the job is immediately created in QuickBooks. TheStart Date becomes the Start Date in QuickBooks, and the Projected End Date becomes the Projected End in QuickBooks. These are the only fields in QuickBooks that ESC affects. Additional fields such as Job Status and End Date will have to be manually adjusted in QuickBooks if desired. Below is a view of the Edit Job | Job Info screen in QuickBooks after a job has been created in ESC.

Peachtree Note: When a job is created in ESC the job is immediately created in Peachtree. The Job Name field is transferred to Peachtree as both the Job ID and Description. The Start Date and Supervisor field are sent the to same fields in Peachtree. The Projected End Date in ESC becomes the End Date in Peachtree. These are the only fields in Peachtree that ESC affects. Additional fields will have to be manually adjusted in Peachtree if desired.
Red Wing Accounting Integration Note: When using the Red Wing interface, all jobs must be setup in Red Wing.
Checking / Updating a Job
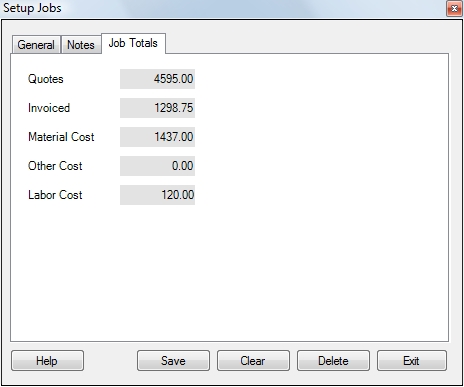
To see how a job is doing at any time you can recall the job on this screen and note or change the status. Click on the Job Totals tab to view the total amount quoted and compare that against what has been billed and applied to the cost of job. For more detail you can also run the Job Sales Report in ESC or job reports in your accounting software.
You can update a job by changing the status code, dates or notes associated with the job.
Completing a Job
When a job has been completed and the final invoice, created come to this screen and change the status to Closed and click Save. This will set the Actual End Date on the job. This will allow you to filter out completed jobs so they no longer appear on your report and prevent new entries from being posted to the job. It can also allow you to run reports on just the completed jobs so you can see the profitability of the jobs and compare the actual costs against the estimated costs.
ESC has rules for completing jobs to make sure that someone can’t accidentally close a job that still has active entries. These rules will also prevent anyone from creating entries against a closed job. These rules make it so that you cannot:
Even after completing the job we recommend keeping the job active at this time so that it will be easy to find on reports.
Important Note: Changing the status in ESC does not affect the status of the job in QuickBooks or Peachtree.
Deactivating a Job
If a job doesn't sell within a certain time or has been completed long enough that you are sure you will not need to modify it anymore remove the checkmark in the Active field. Doing this will make sure the job does not appear on any search screens unless you specifically request to Show Inactive Jobs. This is useful for cleaning up your job list, allowing you to concentrate on the jobs that are really active or pending.
While it is possible to delete a job we strongly recommend you deactivate it instead.
Important Note: Neither deleting or deactivating job has any affect on the job in QuickBooks or Peachtree. Consult with your accounting documentation to see how to deactivate the records there as well.
 The Notes Tab
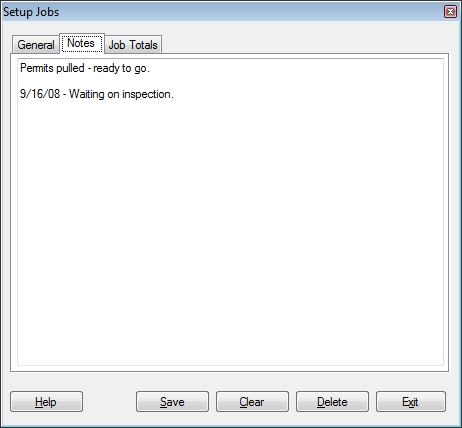
 How do I get to this screen?
 Related Topics