
ESC allows you to keep track of the equipment your customers have. This can help you in the following ways:
How To
Field Explanations
Adding New Equipment
To add a new piece of equipment to a customer’s file, display the desired customer and location on the Enter Customers, Enter Dispatches, Enter Service Agreements, or Enter Invoices/Quotes/Credit Memos screen. Switch to the Equipment tab and click Add New in the toolbar to display the Add Equipment screen.
Enter a new piece of equipment for this customer using the following fields:
Manufacturer
Enter the manufacturer here for the particular piece of equipment. It is important to standardize manufacturers’ names so that accurate sorting and selections can be made from other areas of the software. Frequently-used manufacturer names can be entered permanently into the system through the Enter Manufacturers List on the Customer Info pull-down menu. They will then be available to be selected in this field by clicking on the down-arrow and selecting the manufacturer type from the list. Any manufacturer that is entered into this field will not automatically be added to the manufacturers in the drop-down list.
Model
Enter the model number of this piece of equipment here. Standardization here is also important because of sorting and selecting features in other parts of the program.
Type
Use this field to select the general type of equipment you are entering. Equipment Types should be entered permanently into the system through the Enter Equipment Types on the Customer Info pull-down menu. They will then be available to be selected in this field by clicking on the down-arrow and selecting the equipment type from the list.
It is important to enter this information. It is common to forget what type of equipment is represented by a particular model number. Adding the equipment type removes that problem and also allows you to run reports based on customers that have a particular type of unit, regardless of who makes it or the model number.
Example: You may want to see all customers that have Gas Water Heaters regardless of who made them. Placing Gas Water Heater in this field will allow you to run an Equipment Report filtered by this field.
Equipment ID
Also known as an asset tag, this field allows youto assign your own unique number to the item that you will use to identify it. This number must be completely unique and once it has been assigned it cannot ever be changed.
Customers using this field will typically have pre-numbered labels created that include their contact information on them. The labels are then placed on the unit where they will be visible to the end user. You can then use this number to identify the customer when they call in by searching for it on the Qualification Screen.
This field may be ignored if you do not wish to record unique identifying numbers for your equipment records.
Serial Number
Enter the serial number for this piece of equipment. Equipment reports can be selected and generated by the Serial Number field. Customers may also be identified by searching for the serial number on the Qualification Screen and any of the equipment reports.
Mfg Code
Use this field to enter an additional manufacturer’s code if one exists. Equipment reports can be filtered by this field.
Set as master record on the service agreement for meter readings
This checkbox only appears if you have selected the Enter usage as meter readings checkbox on the Agreements tab of the System Setup screen. Check this box to specify that this piece of equipment is the one that the meter readings will be applied to. Many pieces of equipment may be attached to a service agreement that tracks meter readings but only can be the master. See the Enter Meter Readings topic for additional details.
Install Date
Enter the installation date of the piece of equipment in this field. All that is necessary is 6 straight digits without slashes, and the program will format the entry into correct date format. Examples: for dates in years less than 2000, enter "010199" (without quote marks), and it will format itself to be "01/01/1999". For dates in the year 2000 or following, enter "010103" (without quotes), and it will format itself to be "01/01/2003". Reports can be generated based on the Install Date.
Warranty
Enter the Warranty Expiration date of the piece of equipment in this field. All that is necessary is 6 straight digits without slashes, and the program will format the entry into correct date format. Examples: for dates in years less than 2000, enter "010199" (without quote marks), and it will format itself to be "01/01/1999". For dates in the year 2000 or following, enter "010103" (without quotes), and it will format itself to be "01/01/2003". Reports can be generated based on the Warranty date.
Agreement
Click on the down-arrow button to the right of this field to see the existing Service Agreements for this customer and location. Click on any agreement number to select it. Selecting a service agreement number is not required but it may be helpful to see which pieces of equipment are covered by the agreement. Equipment reports can be selected and generated by the Agreement field. Service agreements for your customers are entered through the Agreements | Enter Service Agreements screen.
Equipment Location
This field can be used to denote the physical location of this piece of equipment, such as "roof," "basement," "Bldg. 5," etc. Equipment reports can be selected and generated by the Equipment Location field. This information will also appear on dispatch tickets if they are set to print Equipment. This can be set from the System Setup - Dispatch screen.
Sort
Use this field to enter additional information about the selected piece of equipment. The information in this field can be selected when printing equipment reports. Up to 3 characters or numbers may be entered in this field. Example: A certain piece of equipment may have changed substantially over time but the model number remained the same. Use this field to keep track of the revisions. The same information could be entered in the Notes field, but the Notes field cannot be searched.
Notes
Many lines of free-form notes about the selected piece of equipment can be entered here. This information is visible in the Equipment Grid on the Equipment Entry and Qualification screen.
Custom Fields
These fields can be configured to store custom data about your customers' equipment. See the Equipment Custom Fields help topic for more details on how to setup and use these fields.
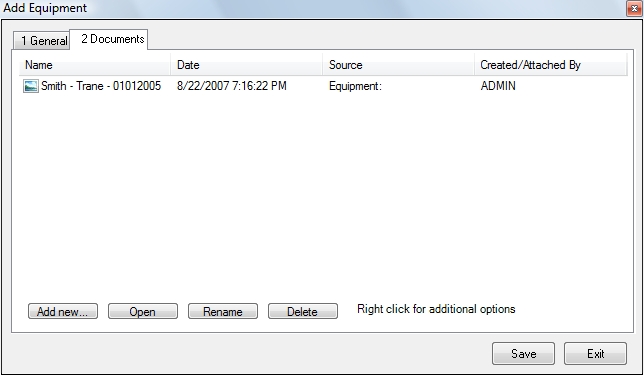
Attaching Documents to a Piece of Equipment
Documents can be attached to a piece of equipment by selecting the Documents tab then clicking the Add New button or right-clicking within the tab and select Add File from the resulting list. This can be great way to keep track of exactly what the equipment looked like on each visit (as shown below) or a convenient place to attach troubleshooting documents and schematics on the equipment. See Attaching Files for more details on attaching documents.
Editing Equipment Records
To edit any existing equipment record, either single-click on it and click on the Edit button, or double-click on the line. The Modify Equipment screen will be displayed showing that piece of equipment:
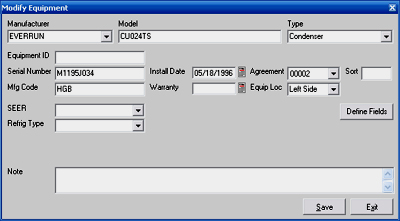
Make any changes in any fields and click on OK when done, then Save the customer.. Click on Cancel to exit the screen without saving any changes.
Deleting Equipment Records
If you wish to completely remove an equipment record from a customer’s equipment listing, search and display the customer, click on the equipment line, and click on the Delete button on the toolbar in the tab. A prompt will be displayed asking "Are you sure you want to delete the highlighted equipment?" Click Yes to delete the equipment record, or click No to cancel the procedure. Be sure to save the customer when you're done or the change will not be committed to the database.
Customizable Grid
The data in the equipment grid, which is displayed on the Equipment Information and Qualification screen, may be displayed in different ways depending on your preferences. Changes made to the grid will only affect the current company on the current computer.
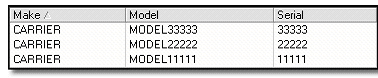
Sorting the data: clicking on any column heading (Make, Model, Serial, etc.) will sort all of the equipment records in descending order. Note the down-arrow next to the column name that was clicked. Click it again, and an up-arrow will be displayed showing that the data has been sorted by that column in ascending order.
Column Resizing: With the mouse, pass the cursor over the dividing line between the column headings. It will change to a different icon when it sits exactly over the dividing line. Click and hold your mouse, and the divider may be moved to the left or to the right. In this way, any column in the grid may be resized depending on the amount of data that you wish to see.
Column Moving: Click and hold your mouse on any column heading, and move it to the left or to the right past other columns. Release the mouse, and it will drop the original column to the new position.
 How do I get to this screen?