Any dispatch that has ever been entered into the system may be located, viewed and printed through the Search for Dispatch screen. Two different reports are also available through this screen.
Displaying Dispatches
Use the fields on this screen to select the dispatches you want to view. Once you have set the criteria click the Display button to show a list of all dispatches that match. The dispatches will be displayed in the middle section of the screen. Click on any of the headings to sort the dispatches by that heading. Clicking the same heading again will reverse the sort order.
Clicking on any of the dispatches once will display the dispatch notes at the bottom of the screen. You can then use the arrow keys to navigate up and down through the list of selected dispatches. Clicking the Techs tab will display the employees that worked on that dispatch and the times associated with the work.
Double clicking any dispatch in the middle section of the screen will cause the dispatch to be recalled on the Dispatch Entry screen. After doing this simply click the Search for Dispatch icon again in the Windows Task Bar to return to exactly where you left off. This allows you to quickly modify a bunch of dispatches quickly.
A complete list of the fields you can use to filter the dispatches is shown below:
Note: Only dispatches that meet ALL the requirements will be selected.
Customer
This field is used to select just the dispatches created for a specific customer. Leave this field blank to select dispatches made by all customers. To search for a particular customer start entering the customer's name and the field will fill with the customer that is the closest match. To search by anything other than name, click the pull down arrow on the right of the field to get the full customer search screen. You can also bypass this field and enter the customer's number, if known, directly in the field to the right of this one.
Location Number
Use this field in conjunction with the customer field to limit the dispatches selected to a single location. Leave this field blank to select all dispatches for a customer regardless of location.
Status
This field is used to select the status of the desired dispatches. This field can be set to any existing Status Code or one of six special codes. The special codes are as follows:
All Dispatches – This code will search for all dispatches, regardless of their status.
Active Dispatches – This code will only search for dispatches that have not been completed. This search does not limit the date range by default so all past and future calls will be searched as well.
Completed Dispatches – This code will only search for dispatches that have been completed. This includes all status codes that have the Leave On Board attribute set to No.
Invoiced Dispatches – Select this option to find only the dispatches that have already been invoiced.
Un-invoiced Dispatches – Choose this option to find only the dispatches that have not been invoiced yet.
PO Received on Active Dispatch – When a Purchase Order is received that has a dispatch number in the Dispatch Number field, that dispatch will appear on a Dispatch Schedule with this status.
Date Promised \ Dispatched \ Completed
These fields can be used to limit the date range searched. Enter the starting date for the search in the first field and the ending date in the second. If the second field is left blank, only the day specified in the first field will be searched. Press the TAB key when finished to move to the next field, or click on one of the search buttons at the top of the screen to start the search.
Be aware of the differences between the different date fields. The promised date is different than the dispatch date or completed date. Example: a call could be promised on Monday but might not be worked on until Tuesday. On Tuesday, when the technician arrives at the job site, he might find the job is larger than originally thought, and he might not be able to complete it until Thursday. Keep these differences in mind when limiting the search by date.
The Date Promised fields default to the beginning and ending of the current month if anything other than Active Dispatches is selected in the Status field.
Speed Tip: Limit the date range whenever possible. It takes considerably less time for the software to search two months than two years. Searches will also be quicker if information is only entered into one of the date ranges (Promised, Dispatch, or Completed).
Priority
Use this field to search only calls that have a particular priority. Enter the desired priority and press the TAB key to move to the next field, or click on one of the search buttons at the top of the screen to start the search. Priorities range from 1 to 9 with the lower numbers being the most urgent. The default priority is 2. Scheduled Service Agreements that have been posted to the EDB are set to priority 8.
Zone
This field is used to limit the search to dispatches that fall within a certain geographical area. Enter the Zone and press the TAB key when finished to move to the next field, or click on one of the search buttons at the top of the screen to start the search.
Technician
This field limits the search to dispatches that were assigned to a certain technician.
Order By
This field controls the order the dispatches will be displayed or printed. It can be set to sort by Date Promised, Dispatch or Technician. Selecting Date Promised or Technician will cause the dispatches in the middle part of the screen to be separated by date or technician in a tree control when displayed. Click the plus sign next to each date/technician to see all the dispatches assigned to that date/tech.
Important Note: If one dispatch spans multiple days or has more than one technician on it selecting Date Promised or Technician will cause the dispatch to display multiple times.
Dispatch Type
Use this field to filter the displayed dispatches by the Dispatch Type. These are either COD or CHG by default.
Notes
Use this field to find any information entered in the Dispatch Notes. Note that this could take a while to run if you select a large date range.
Customer PO
Use this field to find a dispatch by the customer's purchase order number.
Printing
Click this button after displaying dispatches to print them. This will give you three options:
Dispatch Tickets
Select this option to print a dispatch ticket for each dispatch. This is an excellent way to print out all the dispatches for the following day so they are ready to go first thing in the morning.
Schedule
Select this option to print a brief summary of each displayed dispatch.
Schedule With Notes
This option is similar to the Dispatch Schedule except that it also prints out the full dispatch and location notes.
 Search for Dispatch
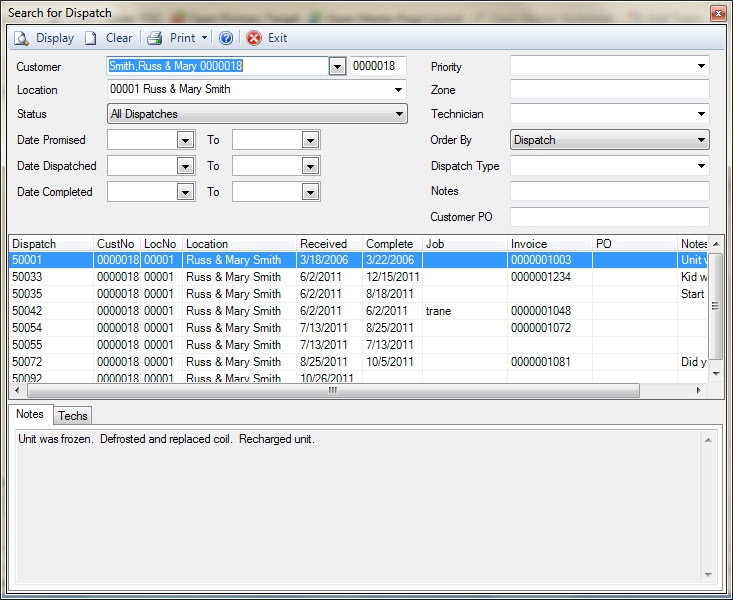
 How do I get to this screen?