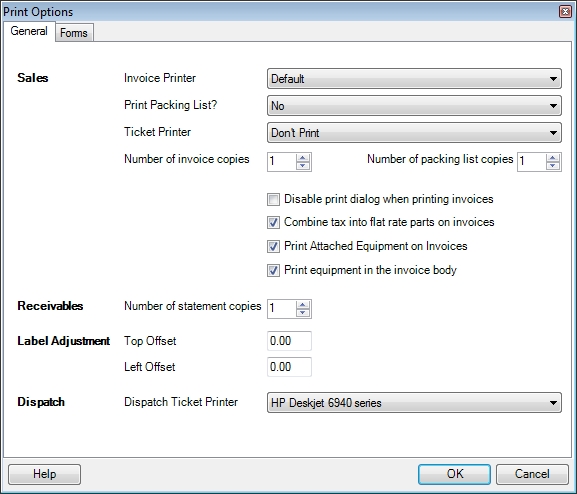
This screen is used to change different printing parameters, such as paper type, invoice printer, packing list, ticket printer, and quantity to be printed. The Forms tab also has buttons that allow you to customize different forms within the software such as sales invoices, statements, and purchase orders. After making a change, click on the Save button. If no change is desired, click on the Exit button.
Sales
Invoice Printer
The drop-down list will display all of the printers that are attached to this particular computer. To add or delete printers, go to the Windows Start button, Settings, Printers. It’s frequently desirable to send printed invoices to a printer other than the default printer of the workstation. For example, a bookkeeper may keep printed invoice forms loaded on their printer in another office. Selecting a printer here other than "default" will send printed invoices to any printer on the network that has been added through the Windows Printers procedure. Enter a number of Copies here to be produced each time an invoice is printed.
Print Packing List
Select Yes here to print a packing list each time a sales invoice is printed. A Packing List is similar in appearance to a printed sales invoice, except that it doesn’t show any prices, amounts, tax or totals. Select No to prevent printing a Packing List. Enter the number of Copies to be printed each time a sales invoice is printed.
Ticket Printer
When applying a payment to an invoice using the Tender Screen, clicking on the Receipt button will print a receipt to a printer designated as the "ticket printer". If printing is not desired, select "Don’t Print". The drop-down list will display all of the printers that are attached to this particular computer. To add or delete printers, go to the Windows Start Button, Settings, Printers. Select the desired ticket printer from the list. Call us for a list of currently supported printers.
Number of invoice copies
Selects the number of copies of an invoice that will be printed when the print button is activated on the Sales Invoicing screen.
Number of packing list copies
Selects the number of copies of an invoice that will be printed when the print button is activated on the Sales Invoicing screen.
Disable print dialog when printing invoices
Select this option to always print to the invoice printer specified on this screen instead of prompting the user for the printer they want to use.
Combine tax into flat rate parts on invoices
Checking this option will determine whether flat rate items on a sales invoice will print as a single line-item including the sales tax, or if the sales tax will print as a separate item on the invoice. When a customer is quoted a flat rate price on a repair, it might be easier for them to see the price including tax as a single item.
Print Attached Equipment on Invoices
When sales invoices (and service dispatches) are created, pieces of the customer’s equipment may be attached to the invoice. Check here if you wish the invoice to be printed including the attached equipment.
Print Equipment in the Invoice Body
Select this option to allow an unlimited amount of equipment to print in the body of the invoice. When using this feature you will generally not want to put separate equipment fields on the invoice form.
Receivables
Number of Statement Copies
Enter the number of statements to be printed for each customer.
Label Adjustments
Individual printers may require small adjustments in their printing in order for text to align properly on pre-printed labels. Use the settings below to make those small printing alignment adjustments for the top of the printed area and for the left margin of the printed page. Measurements are in inches. Use positive numbers to move the printed text down and to the right, negative numbers move the text up and to the left.
Dispatch
Dispatch Ticket Printer
Select this option to always print dispatch tickets to the printer specified instead of prompting the user for the printer they want to use.
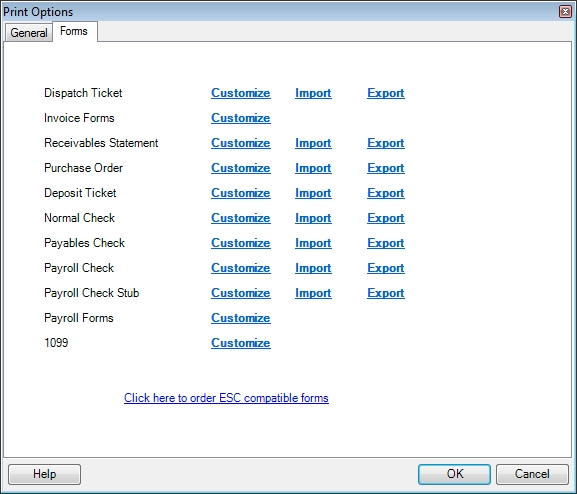
The Forms tab allows you to customize the layout of different forms within ESC.
Customizing Invoices
Click the Customize button next to Invoice Forms to display the Invoice Properties screen which allows invoice forms to be added or customized. See the Invoice Properties help topic for more details.
Customizing Other Forms
Clicking the Customize button next to any of the other form types displays a menu with three options:
Customize: Displays the Layout Designer screen to allow customization of the selected form. See the Layout Designer topic for more information on this screen.
Import: Allows you to import a previously exported template file into ESC. This will overwrite the current statement layout.
Export: Allows the saving of the current form layout to a template file. This file may be imported into another ESC database or used as a backup. We highly recommend doing this before customizing the form so that you will have a backup you can restore if the customization does not go as planned.
Customizing Payroll Forms
Click the Customize button next to Payroll Forms to display the Payroll Forms window. This window will allow you to add, delete and modify payroll forms such as W2, W4, etc. See the Payroll Forms help topic for more details.
Customizing 1099 Forms
Click the Customize button next to 1099 to display the 1099 Forms window. This window will allow you to add, delete and modify all the different 1099 forms. See the 1099 Forms help topic for more details.
 The General Tab