 The Invoice Tab
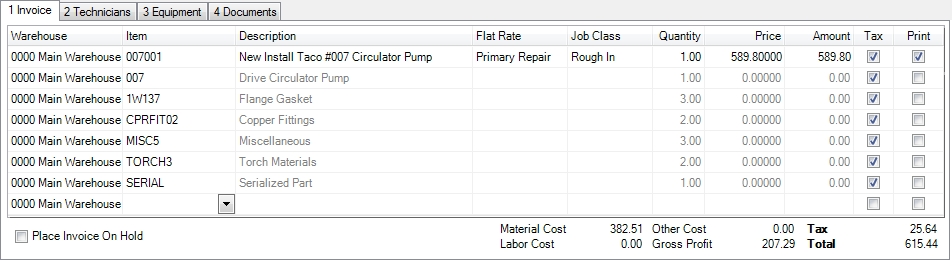
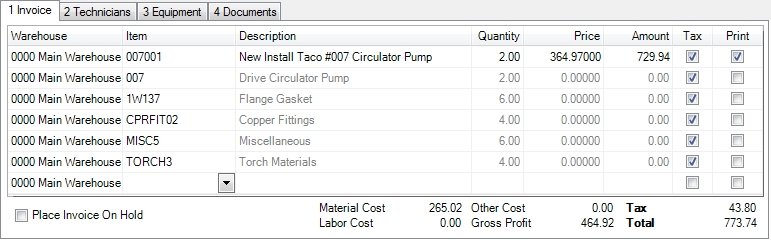
The Invoice tab is where you enter the details of the invoice. See the description of the columns below then go on to read the differences between the types of data you can enter into this tab.
Column Description
The invoicing tab can contain the following columns.
Warehouse
Use this column to select the warehouse that supplied the parts for the invoice. To reduce the amount of work required to enter an invoice, new items that are added to the invoice will automatically inherit the warehouse from the line above.
Item
Enter the part number, billing code or history code here. As you type, ESC will display the first item that matches what you have typed so far. Press Tab at any time to accept the displayed item.
If you are unsure of the part number or code, click the down arrow to the right of the screen or press Alt+Down Arrow to display the Search screen.
Description
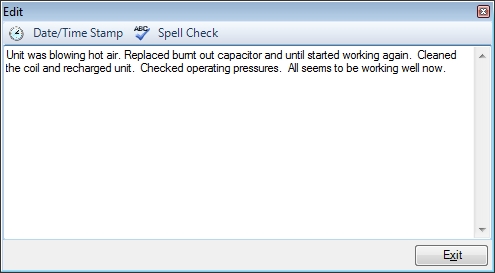
This field shows the description of the part, billing or history code. You can overwrite the description by simply typing in this field. To edit the existing description click the down arrow to the right of the field or press Alt+Down Arrow. This will display the edit screen, where you can also check the spelling of anything you type.
Job Class
This column will only appear if a job is associated with the invoice and you are using ESC Accounting or the Peachtree integration. It allows you to classify the inventory part or billing code if desired. It is not required.
Flat Rate
This column will only appear if a flat rate task is added to the invoice. It will allow you to switch between the different flat rate price levels. The drop down control will be blank for parts that are not setup as flat rate tasks, as well as billing or history codes.
Quantity
Enter the quantity of the part or billing code being sold. This field should not be changed when adding a history code to the invoice.
Price
This field will display the price of the part or billing code you are selling. This price can be changed manually if desired. This field must be left at $0.00 when adding a history code to the invoice as they are not associated with any accounts.
Amount
This field will show the total amount that is being charged on the line. It cannot be changed directly because it is the product of the quantity multiplied by the price. To change this amount adjust the price or quantity instead.
Tax
This checkbox determines if the line will be subject to the tax code applied to the invoice. This does not necessarily mean that tax will be charged on the line, just that it could if the tax code specifies it.
Example: If a labor billing code has the tax box checked, the line would only be taxed if a tax code was applied to the invoice that taxed labor.
This checkbox determines if the line will print on the invoice. This allows you to put items on the invoice that are never seen by the customer. This can be particularly handy for writing history notes that you don't want the customer to see.
Tip: Click here to see how to navigate through the invoice tab effectively using only your keyboard.
Entering Parts
Parts are items that have been setup on the Inventory Entry screen. When you add a part to the invoice, the price will automatically be displayed. This Price Code used on the invoice will determine which price is shown; A, B or C.
As the part is added, the average cost of the part will also be added to the material cost of the invoice. Once the invoice is saved, the actual cost of the part will be determined based on the inventory valuation method you are using (FIFO, Average Cost or Last Purchase Price).
When you add a serialized part, you will be prompted to select the serial number from the list of those available. If no serialized items are in stock you will not be able to add the part to the invoice.
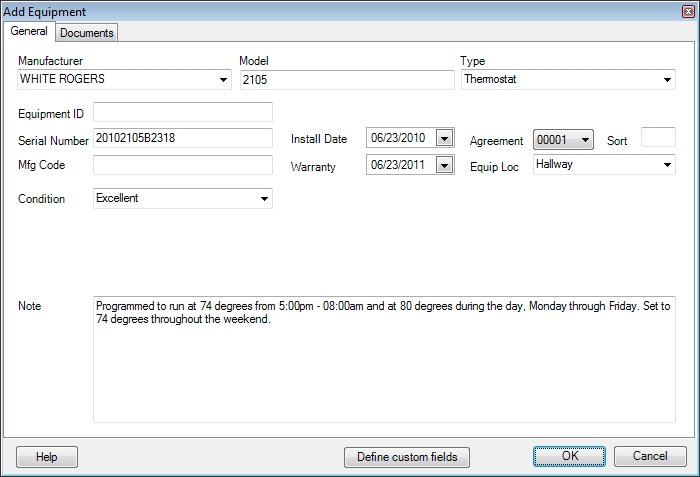
If a part has been setup to Post to Equipment, it will display the equipment record it will create as soon as the part is added to the invoice. This gives you the ability to modify the equipment record before saving it. This can be very beneficial if you need to modify custom fields, add equipment notes or attach photos of the unit.
Once the equipment has been saved, by clicking the OK button, it will also be automatically attached to the invoice on the Equipment tab.
Example: By setting the part to Post to Equipment when it was created, the Manufacturer, Model, Type, Install Date and Warranty are automatically added to the equipment record when it is placed on the invoice. At this point information was manually added to the Agreement, Equipment Location, Notes and the custom field called "Condition." It is possible to add a Serial Number at this point as well, even if it is a stock item!
Entering Assembly Items
When an assembly part is placed on the invoice all the subassemblies that make up the part will be displayed underneath it. The subassemblies will have the print box unchecked automatically so although you can see the parts that make up the assembly the customer will not.
The subassemblies are linked to the assembly part so changing the quantity of the assembly will change the quantity of the subassemblies as well. The only exception to this is if the assembly includes serialized parts. In this situation the extra serialized parts will have to added to the invoice manually so that you can select the correct serial number.
One of the benefits of showing the subassemblies on the invoice is that you can replace them or edit the quantities manually if desired. Be sure to change the quantity of the main assembly before doing this as changing it afterwards will reset the quantities of the subassemblies.
Example: An electrical assembly normally includes 100' of cable and you are installing two of them for a customer. At the end of the job you find you have only used 150' of cable but had to install an extra junction box that wasn't included in the assembly. To handle this without changing the price you would first put the assembly on the invoice and increase the quantity to 2. The cable item would then show a quantity of 200. Change that to 150. Notice the price doesn't change as you do that. Now add the junction box as a new part on the invoice. Set the price to zero and make sure the print box is not checked.
Entering Flat Rate Items
When a flat rate item is added to an invoice, the Flat Rate column will appear. Use the pull down control in that column to select the different flat rate levels available to you, including the default - which is None.
Note: The flat rate price shown on the line item does not include tax so it may not match your flat rate price book. Ensure the tax code on the invoice matches the tax built into your flat rate price and the invoice itself should be correct. See this topic for more information on how to include the tax with the line item when the invoice is printed.
Tip: Flat rate tasks imported from a third party vendor, such as Callahan / Roach or Profit Strategies, will always be assembly items. On the search screen, set the Type to Assemblies to find them easily.
Entering Billing Codes
Billing codes are used for items that are not something you can physically stock - such as labor or permits - or items that you don't want to enter as a part (because you use it infrequently). When you add a billing code to an invoice the price and description will automatically be displayed. Certain billing code types may also create a pop up window asking you for more information. This is true of discount type codes, which will ask you for the discount percentage, and other types of codes which include costs accounts.
Entering History Codes
History codes serve several purposes.
When you add a history code to the invoice the description will automatically appear. These descriptions are usually fairly generic. Once they have been added to the invoice, however, you can easily modify the description to be more informative.
Example: To tell the customer more about the new programmable thermostat you installed for them, you would add a history code to the invoice that said something like "Installed thermostat." This could then be edited to show, "Installed thermostat. Programmed to run at 74 degrees from 5:00pm - 08:00am and at 80 degrees during the day, Monday through Friday. Set to 74 degrees throughout the weekend." This gives the customer much more information and enables you see exactly what you did the next time the customer calls. It also gives you the ability to run a report and see exactly how many thermostats you installed this month.
Note: History codes cannot have a price associated with them because they are not linked to any account. Likewise, changing the quantity of a history code has no affect on the rest of the software.
Next Step - The Other Tabs
 Select Serial Number
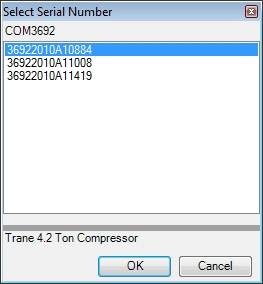
 How do I get to this screen?