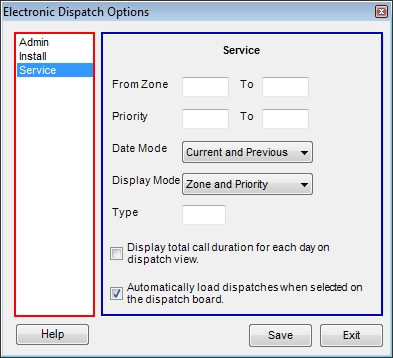
This screen is used to change the information displayed on the EDB. This screen is divided into two sections: the left section is used to select the board that will be modified while the right section is devoted to customizing the information that will be displayed when that board is selected on the dispatch board. The fields below are color coded to show the section they reside in.
Board
A dispatch board is used to display, enter, and modify the schedules of up to 20 employees at a time. This window shows a complete listing of all existing dispatch boards. Click the desired board to select it. All changes made in the right section will be applied to ALL users of the selected board the next time they enter it.
To create additional dispatch boards or modify existing ones, pull-down the Dispatch menu, and click on Setup Dispatch Boards.
Zone
These fields can be used to limit the dispatches shown on the EDB to those within a certain area. Enter the starting zone in the first field and the ending zone in the second field. If the second field is left blank, only dispatches that fall within the starting zone will be displayed. These fields are blank by default so that all dispatches are displayed. This is useful is your company has more than one dispatcher who is responsible for work done in only one area or zone of the city. Using the zone number to limit the dispatches that are displayed will assist a dispatcher in keeping their technicians working in the same area rather than spending extra time in unnecessary travel.
This field can also be helpful for quickly finding pending dispatches near a technician's current position. Rather than sorting through a lot of open dispatches one by one, use these fields to show only the dispatches near where the tech is now, assign the dispatch then reset these fields to show all dispatches.
Priority
Dispatches displayed on the EDB can be limited to calls that only fall within a certain priority range. This is a great way to find all low priority calls or service agreements (which default to a priority 8), to fill a technician’s unscheduled time.
It is not, however, a good way to view the dispatches that need immediate attention. Remember that priorities are related to the date and time. Example: a search that is run on priority 1 dispatches could show calls that were promised at both 08:00 and 15:00 while skipping a priority 2 call at 08:00.
Enter the beginning priority in the first field and the ending priority in the second field. If the second field is left blank, only dispatches with the starting priority will be displayed. These fields are blank by default so that all dispatches are displayed.
Date Mode
This field is used to select which dispatches will be displayed on the EDB in the Left Frame and in the Right Frame when using the Dispatch and Week Views (the Month View is unaffected by these settings).
Current and Previous – The Left Frame will show all uncompleted dispatches that have a promised date that matches or is before the current date. The Right Frame will display the same information unless the Week View is selected, then it will also display uncompleted dispatches scheduled for the next week as well. This is the default setting.
Current Only - Left Frame - will only show the dispatches that have a Promised Date that matches the date selected on the EDB. The Right Frame will display the same information unless the Week View is selected, then it will also display uncompleted dispatches scheduled for the next week as well.
All Dispatches – The Left Frame will show all uncompleted dispatches, regardless of the Promised Date. The Right Frame will display the same information unless the Week View is selected, in which case it will show all uncompleted dispatches from the past and present and only those future dispatches that are scheduled within the next week.
Note: If the date is changed from the current date in the Detail Frame, the board will automatically be set to Current Only mode.
Display Mode
This field is used to select what to display on the second line of the dispatches on the EDB.
Display Total Call Duration
Select this option to change the number of calls shown at the top of each day in the dispatch view to be the total amount of time it should take to complete those dispatches. This is based on the estimated hours associated with each dispatch.
Automatically Load Dispatches
Selecting this option will allow you to use the arrow keys on your keyboard to move between technicians and dispatches on the Dispatch view of the EDB. We recommend checking this box if you use that view frequently.
 How do I get to this screen?