 Setup Dispatch Boards screen
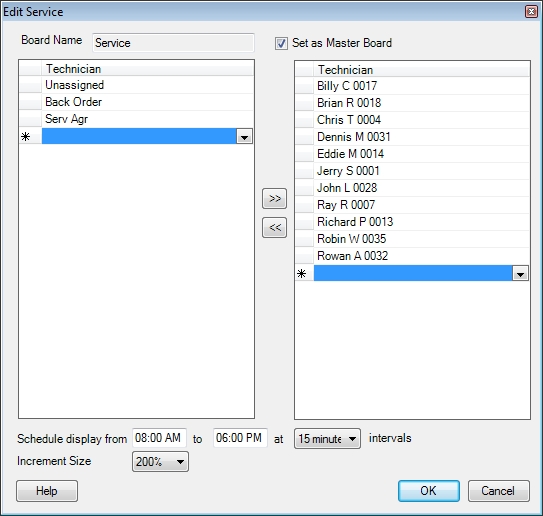
Before any dispatches can be viewed on the Electronic Dispatch Board, a "board" must be created. A dispatch board is simply a way of viewing a group of technicians and their calls that perform similar tasks. Dispatches can then be assigned to a particular technician from a pool of unassigned calls.
![]()
Board Settings
This area is used to setup dispatch boards that can be accessed by all users that view those boards.
Board Name
This field is used to select or enter the name of the dispatch board to be modified or created. To create a new board, enter the desired name of up to eight characters, and press the TAB key. To modify or view an existing board, click on the down-arrow button to the right of this field to display a complete list. Click on the desired board.
Set as Master Board
Click in the box next to Set As Master Board to make the currently displayed board appear immediately when any user displays the EDB screen. If no board is selected as the Master board, ESC will remember the last board each user viewed and display that again when they open the EDB again. Only one dispatch board can be the master so if this box is selected it will remove that flag from the board that currently has it.
Technicians
Just like your dispatch board this screen is divided into a left frame and right frame. The left frame is usually used for Non-Tech Dispatch Columns such as Unassigned, Serv Agr and Back Order while the right frame is used for actual technicians. This allows you to scroll the right frame to show the technician you want and then easily drag dispatches from the left frame to them. Of course you can set this up any way you like, so feel free to play around and find what works best for you.
Adding Employees to the Board
To add an employee to any board start typing the employees's name in the blank space in either frame or select their name from the drop down list.
Rearranging Employee on the Board
To change the order of any employee on the board, click and hold the area to the left of their name and drag the employee up or down to the desired position then release the mouse button. You can also move an employee frame to frame by highlighting the employee and clicking the left or right arrow between the frames.
Removing an Employee from the Board
To remove an employee from the board click their name then press the delete key on the keyboard.
Note: Use common sense when setting up dispatch boards. Although an unlimited number of employees can fit on a single board, only so many can be seen at once, depending on the Windows screen resolution that you have selected on your computer. When dealing with more technicians than that, it might be helpful to have several boards set up. We recommend using one board for each general category of technicians.
Example: A company that does installation and service work for both residential and commercial customers could have four different boards: Residential Installations (Res Inst), Commercial Installation (Com Inst), Residential Service (Res Serv), and Commercial Service (Com Serv). The same technician could appear on more than one board if they commonly switch tasks.
Schedule Display From
These fields are used to control the hours displayed on the Electronic Dispatch Board using the Week and Month View. Large differences between the two can make the Month view particularly difficult to read. We recommend setting these to your scheduled business hours.
The interval field will control how dispatches snap to the dispatch board in the Week View. If the interval is set to an hour, dispatches that are scheduled half hour apart will appear to conflict. Set it to 15 Minutes for maximum clarity and control.
Increment Size
This field is used to control the display of the board when using the Week View. The higher the setting the larger each hour appears on the dispatch board. This is useful when looking for detailed information on each dispatch. Lower settings allow you to see more of the day at once, although with less information. Experiment with different settings to see which you prefer.
 How do I get to this screen?
 Related Topics