Purchase orders give us a way to order and track parts and services requested from other vendors. We highly recommend creating them for any transaction that will eventually be billed to a customer.
Getting Started
The first step in creating a purchase order is to select the vendor you are ordering from. Then assign the record a number by tabbing through the Purchase Order field or creating one manually. The remaining fields on the top part of the screen are not required but can provide valuable information later on so we recommend filing them out.
Shipping Items Directly to a Customer
When a new purchase order is created the Shipping Address is set to your company's address (as defined in System Setup). If you want to send the parts directly to the customer, however, this can be changed to any customer's address by simply selecting the customer in the Ship to field. If you want to send the parts somewhere else altogether, manually change the address to show where you want the parts shipped.
The Body of the Purchase Order
The body of the purchase order contains numerous lines where you will be able to specify the parts or services you want to order.
Ordering Parts
To order parts you have already created in ESC's inventory, change the Type to Item and select the part in the Item field by selecting it from the search control or entering the part number manually. If the part you are ordering does not yet exist in ESC, you can add it on the Inventory Entry screen without closing this window and losing your work. Once it has been created return to this screen and you will be able to add it to the purchase order.
Before moving on to the next line, enter the quantity of parts on order. ESC will automatically populate the price field with the last price you paid for that part but this can be changed now if needed. The department, dispatch and job fields allow you to add additional information to each line that can help you identify who the part is for.
Handling Tax, Freight, Subcontractors and Other Miscellaneous Charges
In addition to ordering parts you might need to include other things on the purchase order. Things like taxes, freight, subcontractor fees and permits are not inventory items but still need to be tracked.
To enter these things onto the purchase order change the Type field to Account. In the Item field select the account that will be debited when the bill is created. Use the Description field to describe the goods or services being ordered. Enter the desired quantity and price if you know it. If the price for these items is unknown when you are creating the purchase order you can leave Price field blank.
If you do not plan on billing the customer for these charges directly you may want to assign these line items to a department or job so you can see the costs associated with the work you do there.
Example 1: We need to add sales tax to the purchase order. So we create an Account line that is affecting our Sales Tax Paid account, has a description of Sales Tax and has a quantity of 1 and a price of $19.83. We will leave the job and department blank since this purchase order was generated to restock our warehouse and we don't know which department or job they will be used on at this time.

Example 2: We know the vendor is going to charge us for shipping but we don't know what the exact charge will be until we receive their bill. In this case we create an Account line that is affecting our Freight expense account and has a description of Freight. We set the quantity to 1 and leave the price field blank. We know the parts on this purchase order are being ordered for our commercial installation department so we set the department to that as well.
Completing the Purchase Order
Once all of your line items have been entered, use the Memo/RMA field to add a note to the vendor if desired. To order the purchase order immediately click the Print or Email buttons on the toolbar at the top of the screen. This will put a checkmark in the Order Placed box which will warn you not to add additional items to the purchase order.
If you plan on adding more items to the purchase order later, click the Save button instead.
Receiving the Purchase Order
See the Receiving Purchase Orders topic for more information on how to perform this task.
 The Enter Purchase Orders screen
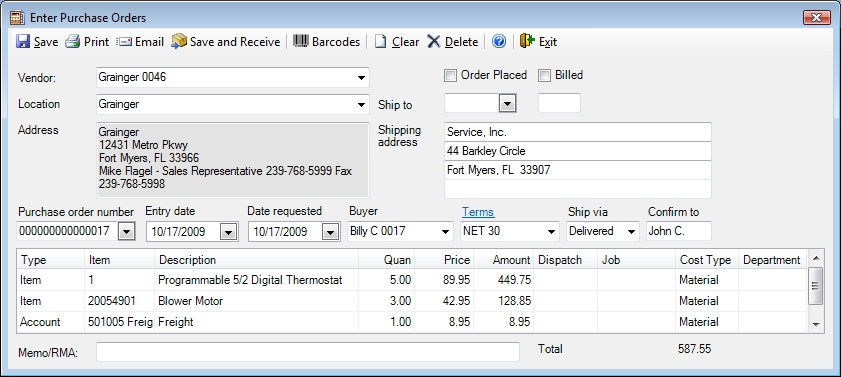

 How do I get to this screen?
 See Also